Intro
Software projects, regardless of their size, benefit greatly from a streamlined process to automate the creation and release of deliverable artifacts. This process, known as build automation, typically involves tasks such as:
- Compiling source code
- Running tests (unit, integration, etc.)
- Generating binary artifacts
Overview
Gradle is an open-source build automation tool that provides a flexible framework for defining and executing automation tasks for various programming languages and workflows. It is widely regarded as a general-purpose build automation tool with broad applications.
Examples of Usage:
- Android Development: Gradle is the primary build tool for Android applications.
- Go and Python Projects: Gradle can automate the software lifecycle, including build and test processes.
- Documentation Generation: With markup languages like Markdown or AsciiDoc, Gradle can produce technical documentation.
Key Characteristics and Features
-
Runs on the Java Virtual Machine (JVM):
Gradle requires the Java Development Toolkit (JDK) to be installed as it operates on the JVM. -
Centralized Automation Logic:
The primary automation logic resides in the build script, which defines the tasks and capabilities for a project. Despite its power, these scripts are often concise. -
Extensibility through Plugins:
Gradle offers a rich library of plugins tailored to various project types. For instance:- The Kotlin plugin streamlines building Kotlin-based projects.
- Plugins exist for conventions and functionalities specific to different ecosystems, reducing the need for custom scripts.
-
User Interfaces:
- Command-Line Interface (CLI): Gradle’s primary interface.
- Integrated Development Environment (IDE) Support: Available for major IDEs such as IntelliJ IDEA, Eclipse, and NetBeans.
-
Continuous Integration (CI) Compatibility:
Gradle integrates seamlessly with CI tools like Jenkins, TeamCity, and GitHub Actions, enabling automated workflows. -
Suitability for Various Project Types:
Gradle is versatile enough to handle:- Microservices
- Large enterprise systems with multiple sub-components
Summary
Gradle is a powerful automation tool suitable for building a wide variety of project types. Its flexibility and extensibility make it ideal for both small-scale projects and complex, multi-component systems.
Additional Insights:
- Consider exploring Gradle Daemon, which optimizes build times by keeping processes alive between builds.
- Learn about Gradle Wrapper, a feature that ensures a consistent Gradle version across environments.
- Advanced users can benefit from custom tasks and incremental builds to optimize performance.
Why groovy or Kotlin?
Understanding Groovy or Kotlin is essential for working with Gradle because the build scripts and configurations in Gradle are written in one of these languages. Here’s why knowledge of these languages matters:
1. Build Script Language
Gradle uses Domain-Specific Languages (DSLs) based on Groovy or Kotlin for writing build scripts. The DSL defines tasks, dependencies, plugins, and configurations in a concise and readable format.
-
Groovy DSL:
Historically, Groovy has been Gradle’s default scripting language, and many examples and legacy projects use it.
Example:plugins { id 'java' } repositories { mavenCentral() } dependencies { implementation 'org.springframework.boot:spring-boot-starter' } -
Kotlin DSL:
Introduced later, Kotlin DSL is gaining popularity due to Kotlin’s strong typing, better IDE support (e.g., IntelliJ IDEA), and enhanced readability.
Example:plugins { kotlin("jvm") version "1.8.0" } repositories { mavenCentral() } dependencies { implementation("org.jetbrains.kotlin:kotlin-stdlib") }
2. Customization and Extensibility
Knowing Groovy or Kotlin allows you to:
-
Define custom tasks for specific workflows:
task hello { doLast { println 'Hello, Gradle!' } } -
Use control structures (e.g., loops, conditionals) to make scripts dynamic and adaptable.
-
Extend Gradle’s capabilities with custom logic written in Groovy or Kotlin.
3. Modern Gradle Best Practices Favor Kotlin
While Groovy remains widely used, Kotlin is preferred in modern projects because:
- Type safety: Reduces runtime errors and improves developer confidence.
- Better IDE integration: Provides robust auto-completion and refactoring tools.
- Static typing: Makes code more maintainable.
4. Plugin Development
If you plan to develop custom Gradle plugins, you’ll likely use Groovy or Kotlin to define your plugin logic. Plugin scripts must be clear, concise, and maintainable, and these languages facilitate that.
Do You Need to Master Groovy or Kotlin?
- Basic understanding is enough for beginners: You don’t need to master Groovy or Kotlin; knowing how to write and modify Gradle scripts is sufficient for most use cases.
- Intermediate skills benefit advanced users: If you plan to create complex builds, extend Gradle with custom tasks or plugins, or work in Kotlin-heavy ecosystems (like Android development), a deeper understanding of Kotlin will be advantageous.
Conclusion
Groovy or Kotlin knowledge empowers you to customize Gradle scripts, improve your productivity, and unlock Gradle’s full potential. As Kotlin gains prominence, it is becoming the go-to language for Gradle scripting in modern projects. Choose the language based on your project’s requirements and ecosystem.
Ways to Install Gradle
There are multiple methods to install Gradle based on your operating system and preference:
1. Install via Gradle Wrapper (Recommended)
- Gradle projects often include a Gradle Wrapper, which ensures consistency by downloading the specific Gradle version required for the project.
- Steps:
- Run the wrapper script provided in the project:
- On Unix/Linux/Mac:
./gradlew - On Windows:
gradlew.bat
- On Unix/Linux/Mac:
- The wrapper downloads the correct version of Gradle if not already available.
- Run the wrapper script provided in the project:
2. Install via Package Manager
-
macOS:
Use Homebrew:brew install gradle -
Linux:
Use a package manager like SDKMAN:sdk install gradle -
Windows:
Use Chocolatey:choco install gradle
3. Install Manually
- Download the binary from the Gradle website.
- Extract the files and configure the environment variable
PATHto include the Gradlebindirectory.
4. Use an IDE with Integrated Gradle Support
- IDEs like IntelliJ IDEA often include Gradle integration, eliminating the need for manual installation. You can create Gradle projects and manage dependencies directly within the IDE.
IntelliJ Integration with Gradle
IntelliJ IDEA provides seamless integration with Gradle, making it easy to manage build automation directly within the IDE.
1. Creating a Gradle Project
- Open IntelliJ IDEA and select New Project.
- Choose Gradle from the project types.
- Configure the project with options like:
- Language: Java, Kotlin, Groovy, etc.
- DSL: Groovy or Kotlin.
- Auto-import: Ensures IntelliJ syncs with Gradle files automatically.
2. Importing an Existing Gradle Project
- Open IntelliJ IDEA and select File > Open.
- Navigate to the folder containing the
build.gradleorbuild.gradle.ktsfile. - IntelliJ automatically detects and configures the Gradle project.
3. Running Gradle Tasks
- IntelliJ provides a Gradle Tool Window (on the right panel by default) where you can:
- Run specific tasks (e.g.,
build,test). - View dependencies and configurations.
- Run specific tasks (e.g.,
4. Managing Dependencies
-
Add dependencies in the
build.gradlefile (orbuild.gradle.ktsfor Kotlin DSL). IntelliJ automatically syncs the changes with the Gradle configuration. -
Example:
dependencies {
    implementation 'org.springframework.boot:spring-boot-starter'
}
5. Debugging Gradle Builds
- IntelliJ allows you to debug Gradle builds by running tasks in debug mode.
- Steps:
- Select a task in the Gradle Tool Window.
- Right-click and choose Debug.
6. Customizing Gradle Settings
- Go to File > Settings > Build, Execution, Deployment > Build Tools > Gradle.
- Configure settings such as:
- Gradle JVM version.
- Use of the Gradle Wrapper or a specific Gradle version.
- Offline mode for Gradle builds.
Summary
Installation Methods:
- Gradle Wrapper (preferred for project consistency).
- Package managers (SDKMAN, Homebrew, Chocolatey).
- Manual download and configuration.
- IDE-based setups (like IntelliJ).
IntelliJ Integration Highlights:
- Simplifies Gradle project creation and management.
- Automatically syncs
build.gradlechanges. - Offers a Gradle Tool Window for tasks, dependencies, and configurations.
- Supports running and debugging Gradle tasks directly.
In a Gradle project, the Gradle Wrapper files are located in the root directory of the project. These files include the scripts and configurations necessary for running Gradle builds using the wrapper. Here’s what to look for:
In a Gradle project, the Gradle Wrapper files are located in the root directory of the project. These files include the scripts and configurations necessary for running Gradle builds using the wrapper. Here’s what to look for:
Gradle Wrapper Files
-
Wrapper Scripts:
gradlew: A shell script for Unix/Linux/macOS systems.gradlew.bat: A batch script for Windows systems.
These scripts are used to execute Gradle commands without requiring a pre-installed Gradle version.
-
Wrapper Configuration:
gradle/wrapper/gradle-wrapper.properties: This file specifies the version of Gradle to be used for the project.
Example content:
distributionUrl=https\://services.gradle.org/distributions/gradle-8.3-bin.zip- The
distributionUrlpoints to the exact Gradle version to be downloaded and used.
- Wrapper JAR:
gradle/wrapper/gradle-wrapper.jar: A JAR file that bootstraps the Gradle Wrapper process.
How to Verify the Wrapper in a Project
-
Open the root directory of your project.
-
Look for the files and directories listed above:
gradlewgradlew.batgradle/wrapper/
-
If these files are present, the project has a Gradle Wrapper configured.
Using the Wrapper
- Run Gradle commands via the wrapper to ensure the correct Gradle version is used:
- On Unix/Linux/macOS:
./gradlew build - On Windows:
gradlew.bat build
- On Unix/Linux/macOS:
This ensures that the build is consistent across all environments, regardless of the system’s installed Gradle version.
Getting Started with Gradle
You don’t need to know much to start working with Gradle. Before diving into code, let’s familiarize ourselves with some key terms you’ll encounter in Gradle.
What is a Project?
- At the heart of every Gradle build is a project.
- A project defines the boundaries and capabilities of a software component (e.g., a Java web application).
- For each software component, you create a Gradle build file that contains build instructions.
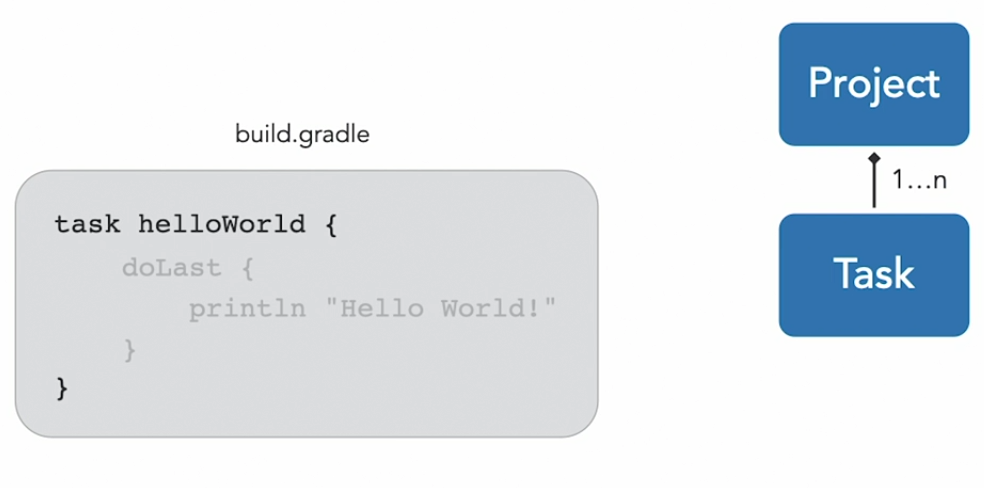
What is a Task?
- A task represents a single step in the build process.
- Tasks define specific automation instructions, such as:
- “Copy file A to directory B”
- “Compile Java code”
- You write tasks in the build script.
1. Create a New Directory
- Name the directory:
hello-world. - Navigate to the directory.
2. Create a Build Script
- Create a file named
build.gradle.- This is the standard name for a Gradle build script.
3. Define the Task
-
Open
build.gradlein a text editor (e.g., Vim, VS Code). -
Add the following code:
task helloWorld {
    doLast {
        println 'Hello, World!'
    }
}
Explanation:
task helloWorld: Declares a new task namedhelloWorld.doLast: Specifies the action to be executed when the task runs.println: Prints “Hello, World!” to the terminal.
4. Run the Task
-
Use the Gradle executable to run the task:
gradle helloWorld -
Hit the Enter key. Gradle will execute the task and print:
Hello, World!
Gradle Project Structure Overview
Understanding the typical file and directory structure of a Gradle project is key to effectively managing and building your software. Let’s break it down step-by-step.
The build.gradle File
- Purpose: Contains the build logic of the project.
- Location: Resides in the root directory of the project.
- Usage: Defines tasks, dependencies, and other build-related instructions.
Structuring Source Files
- Gradle doesn’t enforce a strict structure for source files, but best practices often include:
- Breaking code into multiple components for maintainability.
- Enforcing separation of concerns.
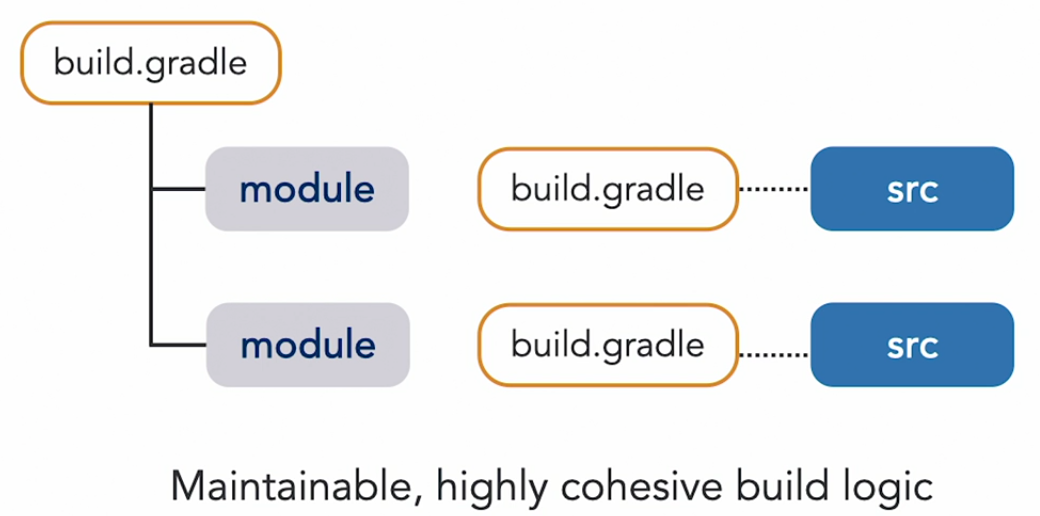
- Multi-Project Builds:
- Gradle can model each component as a project, with dependencies between them.
- Each project can have its own
build.gradlefile to manage its build logic. - These are defined in a multi-project build, which is specified in the
settings.gradlefile.
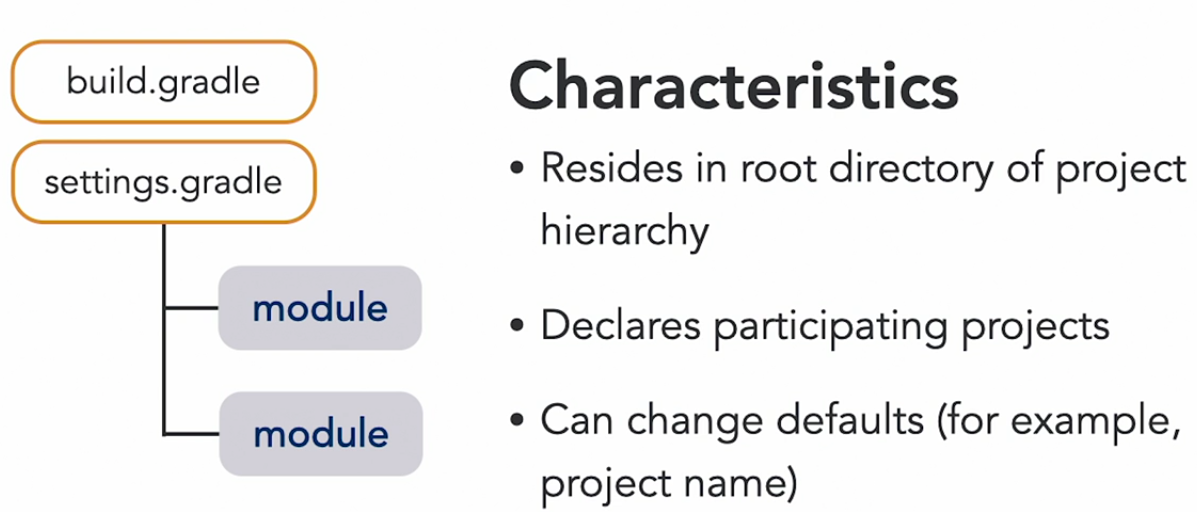
The settings.gradle File - Multi-Project Builds
- Purpose:
- Declares all projects that participate in a build.
- Defines the name of the root project.
- Default Behaviour:
- If no
settings.gradleis defined, Gradle automatically derives the project name from the root directory.
- If no
Example
-
Create a
settings.gradlefile:rootProject.name = 'starter-example' -
Run the
projectstask:gradle projects- Output will show the descriptive project name,
starter-example.
- Output will show the descriptive project name,
-
If there are multiple projects, the task renders a tree hierarchy.
The gradle.properties File
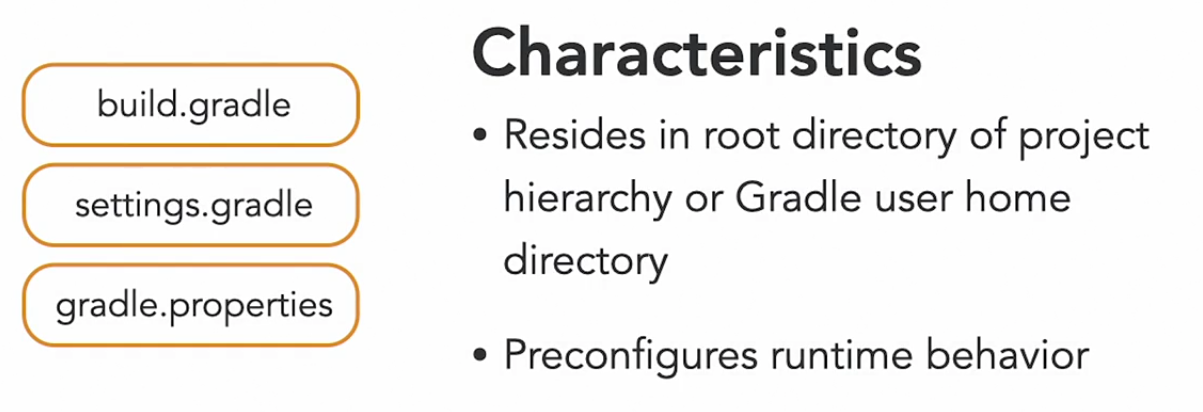
- Purpose:
- Define runtime options for the build.
- Externalize custom key-value pairs that can be used in the
build.gradlefile.
- Location:
- Can be created in the project’s root directory or in the global Gradle user home directory (
~/.gradle/gradle.properties).
- Can be created in the project’s root directory or in the global Gradle user home directory (
Example
- Add properties to
gradle.properties:
    org.gradle.logging.level=info
version=1.0.0-
Access these properties in
build.gradle:println "Project version: ${version}" -
Run the
helloWorldtask to see:- More detailed logging output due to the
logging.levelchange. - The project version printed in the console.
- More detailed logging output due to the
Global Properties
- Define properties in the Gradle user home directory to make them available to all projects on the machine.
- Useful for settings like proxies, default JVM options, or common build configurations.
5. Additional Resources
For detailed information on:
- Multi-project builds: Refer to the Gradle User Guide section on multi-project builds.
- Built-in properties: Check the Gradle User Guide’s Build Environment section.
By understanding these files and their roles, you’ll be able to efficiently organize and manage Gradle projects, from simple single-project builds to complex multi-project setups.
Understanding Gradle Tasks and Actions
-
What is a Task?
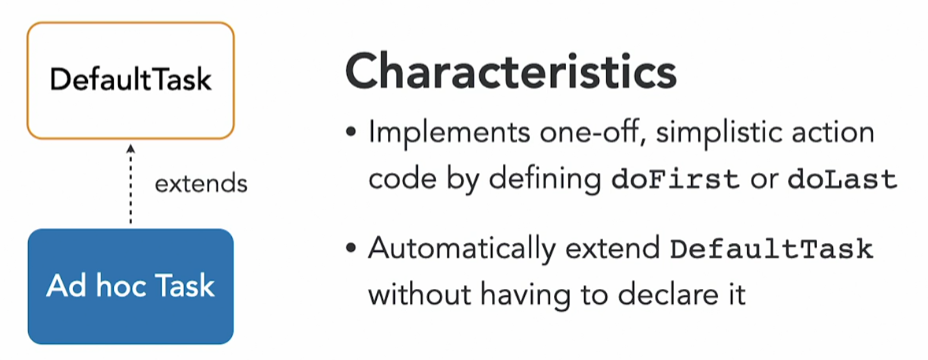
A task in Gradle defines executable work. The logic for the task is implemented using actions. Simple tasks that just perform a single action (like printing a message to the terminal) are called ad hoc tasks. -
Ad Hoc vs. Typed Tasks
- Ad Hoc Tasks:
- Ideal for simple, one-off actions.
- Use Gradle’s default task implementation (
DefaultTask). - Do not require explicitly declaring a type.
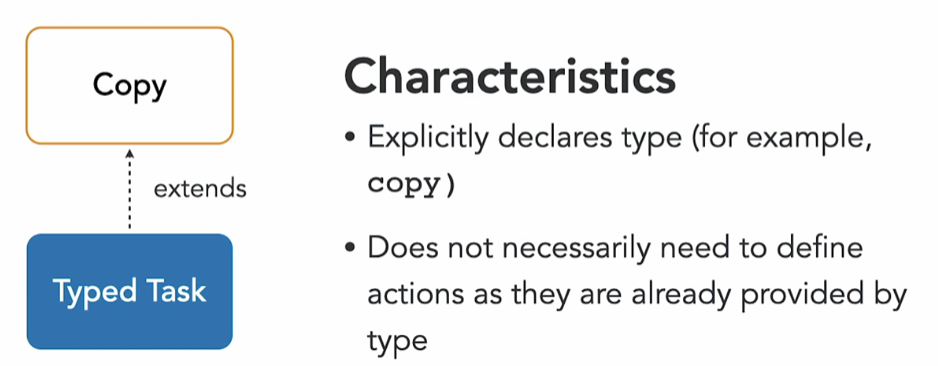
- Typed Tasks:
- Designed for more complex logic.
- Use dedicated types, which encapsulate specific functionality (e.g., the
Copytype for copying files). - Allow configuration through properties or methods without needing to define actions explicitly.
- Ad Hoc Tasks:
-
Example: Copying Files
Suppose you want to copy.mdfiles from a source directory (source) to a target directory (build/docs) while excluding empty directories. Here’s how you can do it:- Define a task named
copyDocswith the typeCopy. - Use the
fromandintomethods to specify the source and destination directories. - Add file filters to copy only
.mdfiles and exclude empty directories.
task copyDocs(type: Copy) {
    from 'source'
    into 'build/docs'
    include '**/*.md'
    excludeEmptyDirs()
}
Run the task with
gradle copyDocs. After execution, the.mdfiles will be inbuild/docs. - Define a task named
-
Archiving Files
To create a ZIP archive from the copied files:- Define a new task
createZipwith theZiptype. - Specify the source directory (
build/docs) using thefrommethod. - Set the output directory and file name.
task createZip(type: Zip) {
    from 'build/docs'
    archiveFileName = 'documentation.zip'
    destinationDirectory = file('build/dist')
}
Run the task with
gradle createZip. The resulting ZIP file will be located inbuild/dist. - Define a new task
Task Dependencies
To ensure tasks run in a specific order (e.g., copyDocs before createZip), use the dependsOn method:
task createZip(type: Zip) {
        dependsOn copyDocs
        from 'build/docs'
        archiveFileName = 'documentation.zip'
        destinationDirectory = file('build/dist')
    }
Directed Acyclic Graph
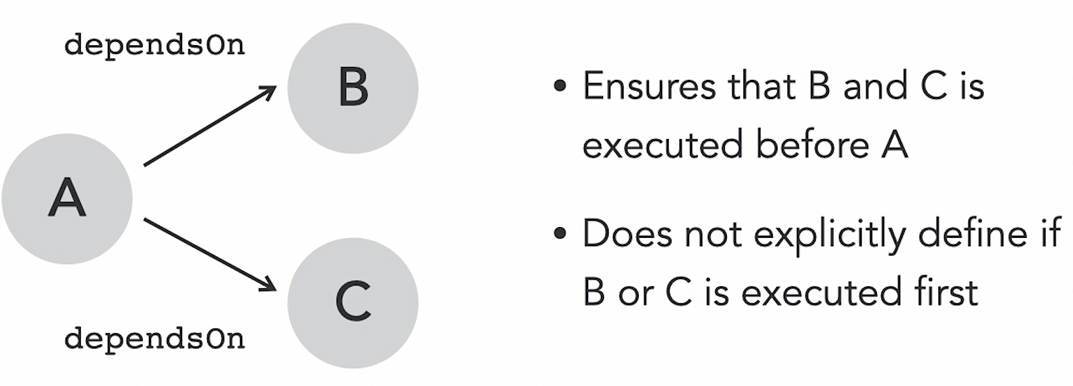
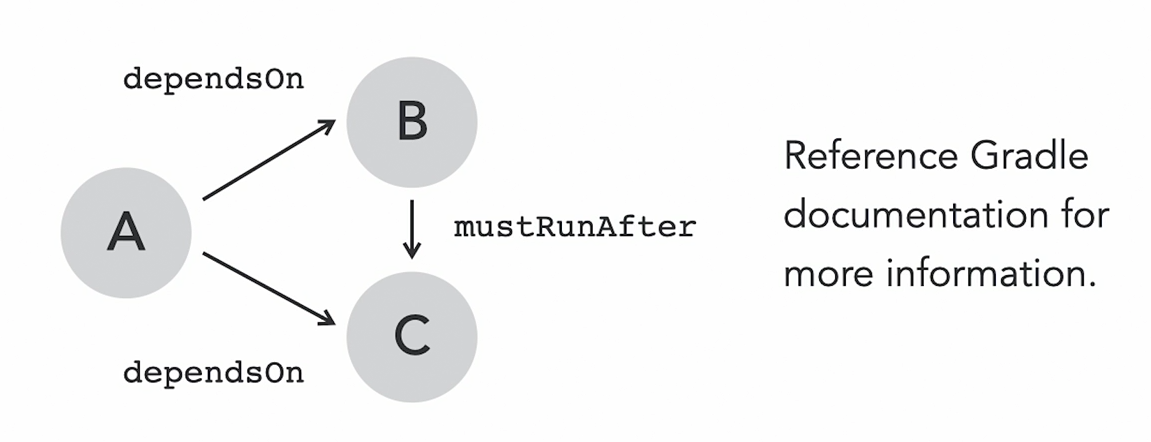
Gradle tasks can have multiple dependencies, but their execution order is not guaranteed. For example, if task A depends on tasks B and C, Gradle might run B first or C first—the order is unpredictable. This usually isn’t a problem as long as all dependencies are executed.
If you need tasks to run in a specific order, Gradle provides methods like mustRunAfter, shouldRunAfter, and finalizedBy. These methods give you control over the execution sequence. Refer to the Gradle User Guide for more details on how to use them effectively.
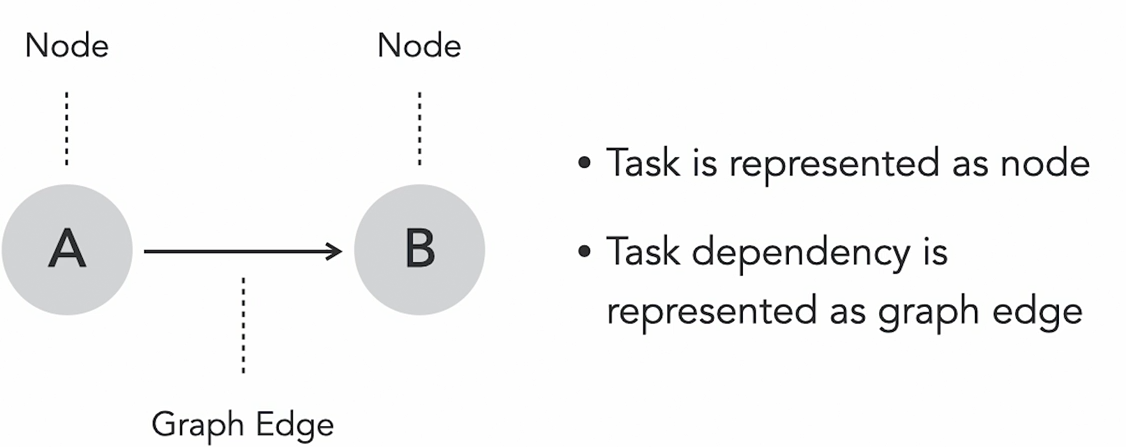
When you run a Gradle build, it creates a directed acyclic graph (DAG) in memory to determine the execution plan. In this graph:
- Each task is represented as a node.
- Dependencies between tasks are shown as edges connecting these nodes.
Since the graph must remain acyclic, a task cannot depend on itself, either directly or indirectly. For example, task A cannot depend on task B if B also depends on A.
Simulating Task Execution
Gradle doesn’t have a built-in tool for visualizing the task graph. However, you can simulate the task execution order using the --dry-run option: ./gradlew build --dry-run
This shows the task execution sequence in the terminal without actually running the tasks.
For a clearer, visual representation of the task dependencies, consider using the Gradle Task Tree plugin. This tool renders the tasks as a tree structure for easy navigation.
Discovering Available Tasks
To see all tasks in your project, including custom ones, run:
./gradlew tasks --allThis command lists every available task in the project. For instance, if you’ve created a custom helloWorld task, it will appear here. This is especially useful for newcomers to a Gradle project who want to understand its structure.
By using these tools and commands, you can effectively manage and explore tasks in your Gradle builds.
Build lifecycle

Gradle processes every build in three phases: Initialization, Configuration, and Execution. Understanding these phases is crucial for knowing when parts of the build script are evaluated and executed. Here’s a breakdown of each phase:
1. Initialization Phase
In this phase, Gradle determines the structure of the build by evaluating the settings.gradle file. This file specifies:
- Which projects participate in the build: It’s essential for multi-project builds but can also exist in single-project builds.
- Custom project names: As shown in earlier examples, you can define project names in the settings file.
2. Configuration Phase
During this phase, Gradle:
- Parses and evaluates the build scripts: Each project can have its own build script, though it’s not mandatory.
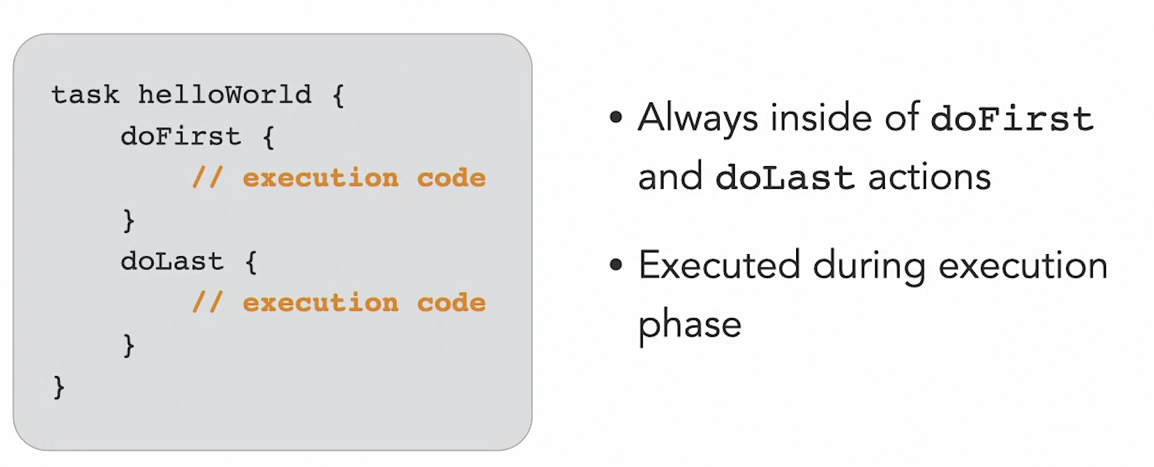
- Configures tasks: This means assigning values to task properties or calling methods exposed by the task’s API.
- Does not execute task actions yet: Task actions, like
doFirstordoLast, are not run during this phase.
💡 Performance Tip: Avoid running expensive logic in the configuration phase, as it can slow down the build process. Only include code that is necessary for task setup.
3. Execution Phase
This is where the actual work happens. Gradle executes the tasks in the correct order based on the directed acyclic graph (DAG) created during the configuration phase.
- Task actions are executed: Logic inside
doFirstanddoLastblocks is run during this phase.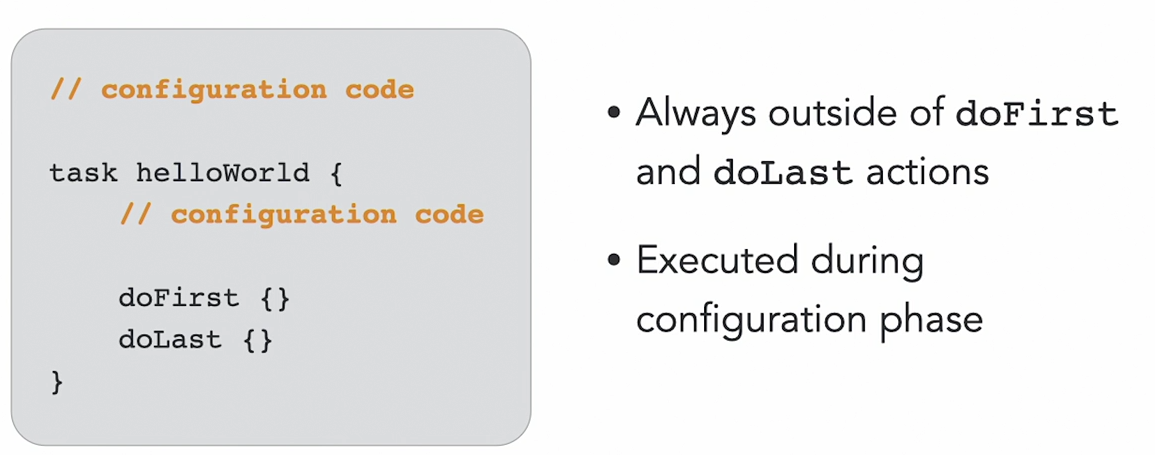
Key Takeaways
- Initialization Phase: Defines the projects involved in the build.
- Configuration Phase: Configures tasks and sets up the project. Avoid unnecessary computations here.
- Execution Phase: Executes the task actions in the correct sequence.
When writing build scripts:
- Place setup logic (e.g., task configuration) in the configuration phase.
- Place task-specific logic (e.g., actual work) in task actions like
doFirstordoLast.
By organizing your build script according to these phases, you can avoid common pitfalls and ensure your Gradle builds run efficiently.
Gradle plugins
Every Gradle build starts with a build script. As you work on different projects, you might notice similar build code across them. Instead of copying and pasting code, Gradle introduces plugins to reuse build logic.
Types of Plugins
- Script Plugins
- These are additional build scripts that can be included in your
build.gradlefile. - Used to organize and maintain build logic better.
- These are additional build scripts that can be included in your
- Binary Plugins
- Bundled in JAR files for more complex logic.
- Useful for sharing functionality across multiple projects, even if they’re in separate repositories.
Example: Using a Script Plugin
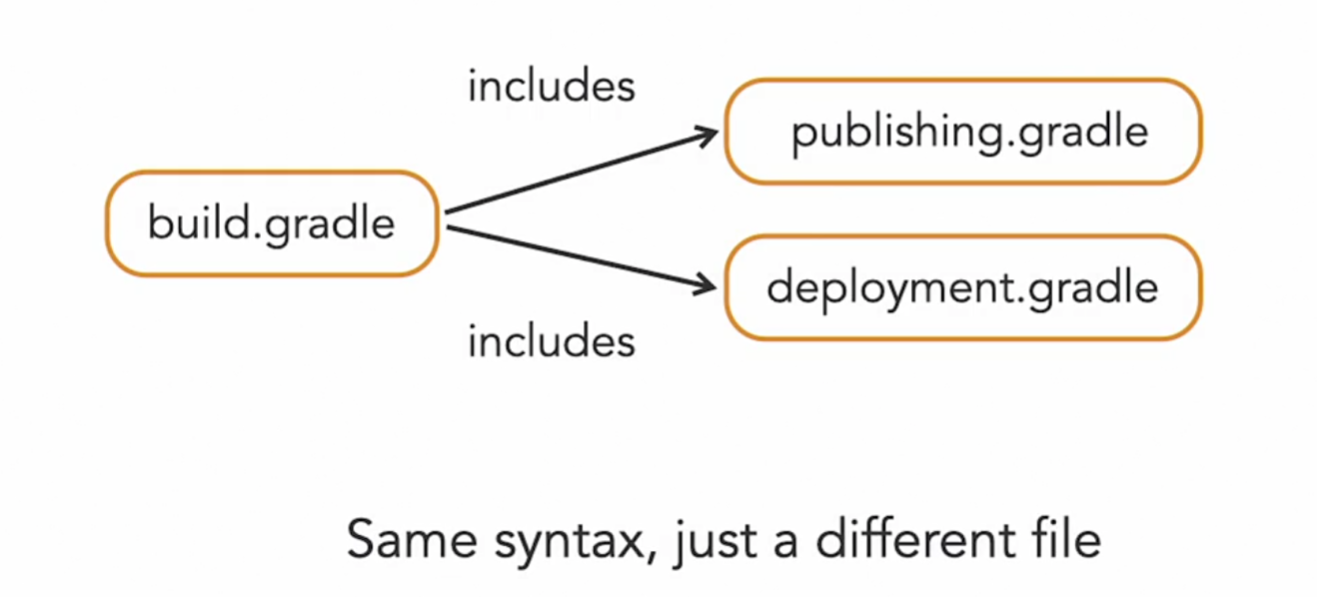
-
Start with a
build.gradlefile that contains tasks likecopyandzip. -
Move the related code into a new file, e.g.,
archiving.gradle(the script plugin). -
In
build.gradle, replace the code with:apply from: 'archiving.gradle' -
Run tasks (e.g.,
createZip) as usual, and they’ll work perfectly.
Example: Using a Binary Plugin
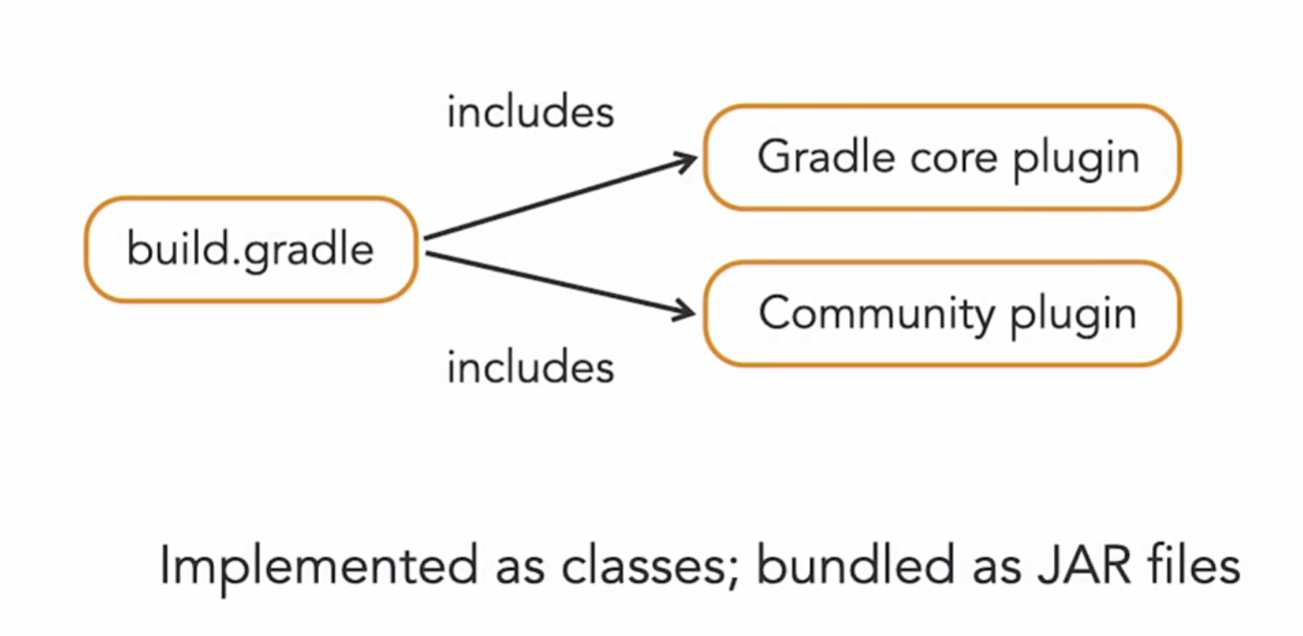
Gradle provides built-in core plugins (e.g., base plugin) and community plugins (available in the Gradle Plugin Portal).
-
Edit
archiving.gradleto apply thebaseplugin:apply plugin: 'base' -
The
baseplugin simplifies the code by providing common tasks and conventions. You can delete redundant lines, as they’re handled by the plugin.
Binary plugins can also be custom-built and shared, but creating them is outside the scope of this guide.
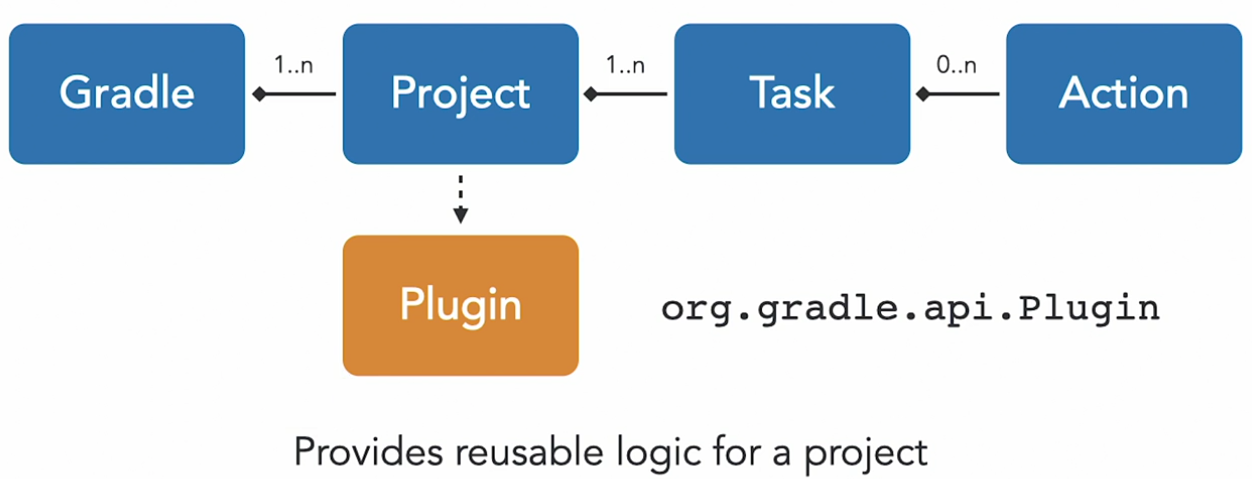
Gradle’s Domain Objects
Gradle represents tasks, dependencies, and other build elements in memory as domain objects. These objects can be inspected and modified directly from a build script, which sets Gradle apart from many other build tools.
This video highlights the key domain objects and their hierarchy.
Key Domain Objects
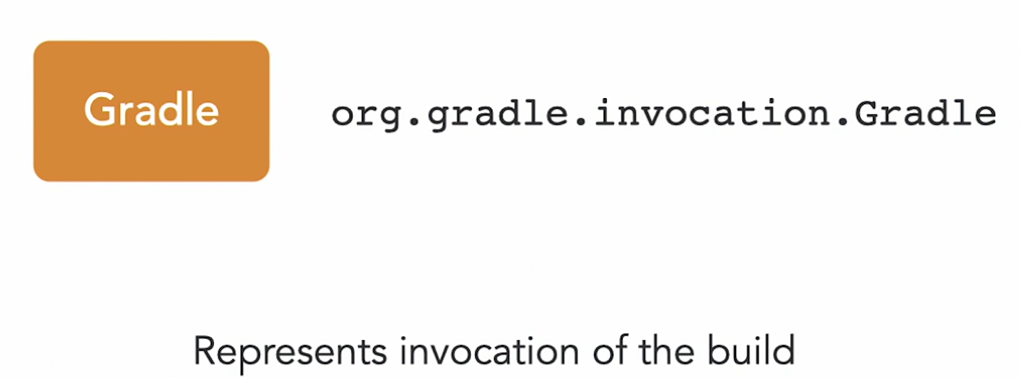
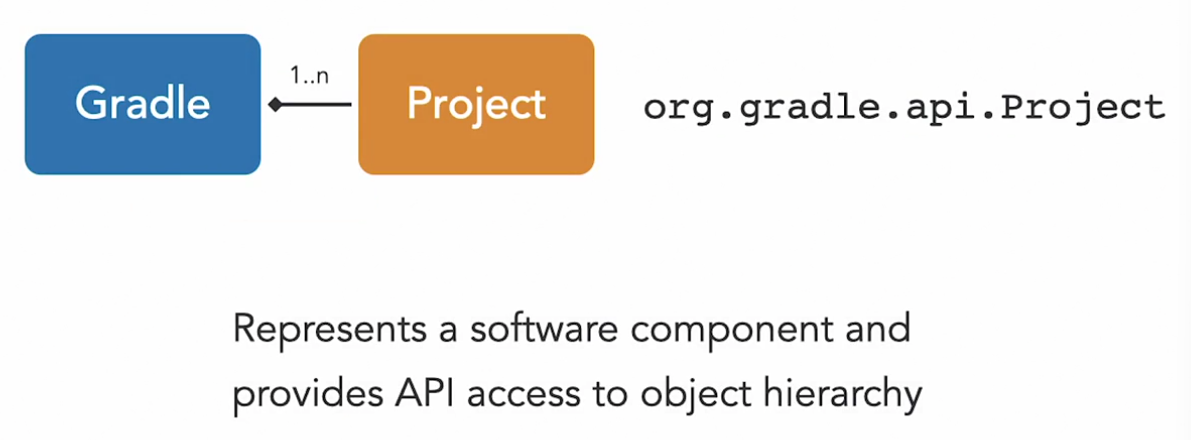
-
Gradle Object
- Represents the entire build process.
- Knows about the project hierarchy (single or multi-project builds).
- Provides access to high-level properties like:
- Gradle user home directory.
- Gradle version.
- Allows registering callback logic for specific build events.
-
Project Object
- The main entry point for any build script.
- Provides methods to navigate and interact with the entire object hierarchy.
- Common uses:
- Registering new tasks.
- Modifying environmental properties like the build output directory.
- Accessing the Gradle instance.
-
Task Object
- Represents a single piece of work in a build.
- Tasks can:
- Declare dependencies on other tasks.
- Define actions to perform (executed in order of declaration).
- Include special actions:
doFirst: Runs before all other actions.doLast: Runs after all other actions.
-
Plugin Object
- Represents applied plugins in a build.
- Plugins can access and modify other domain objects in the project.

Diving Deeper
The Gradle API documentation contains many more domain objects, often listed under the DSL guide. These objects, called decor types, provide additional functionality for advanced builds. Exploring them is valuable for understanding their purpose and capabilities.
task createZip(type: Zip) {
        dependsOn copyDocs
        from 'build/docs'
        archiveFileName = 'documentation.zip'
        destinationDirectory = file('build/dist')
    }
task renameTextFiles('copyFromStaging', Copy) {
print "starting the rename task"
rename '(.+).txt', '$1.text'
}
task createTar(tar: Tar) {
dependsOn renameTextFiles
archiveFileName = "my-archive.tar"
destinationDirectory = file('build/dist')
}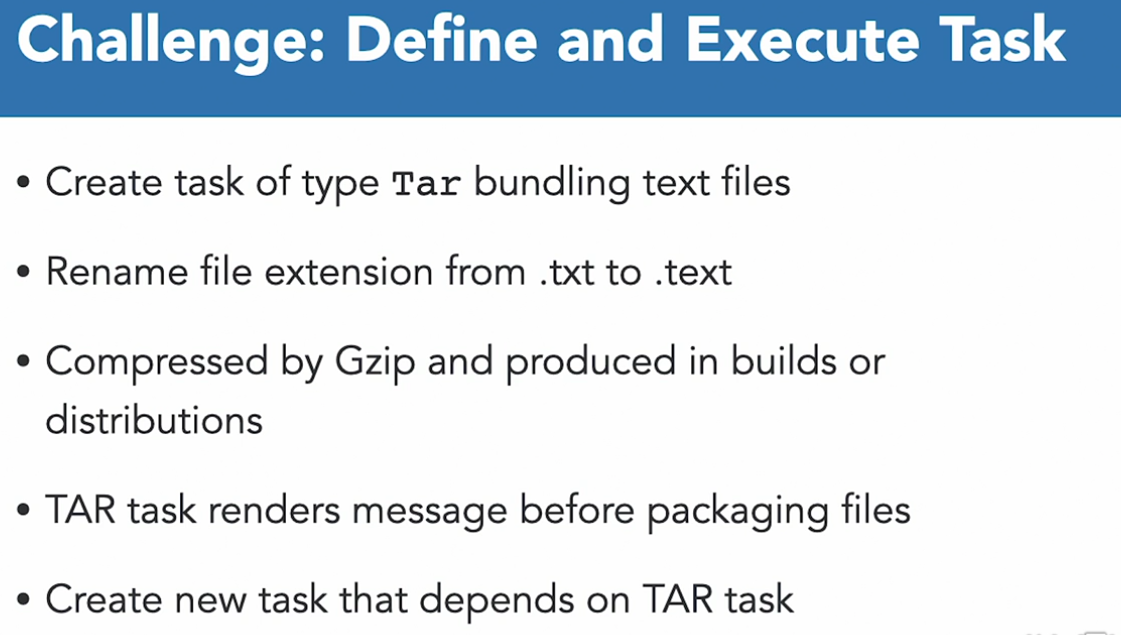
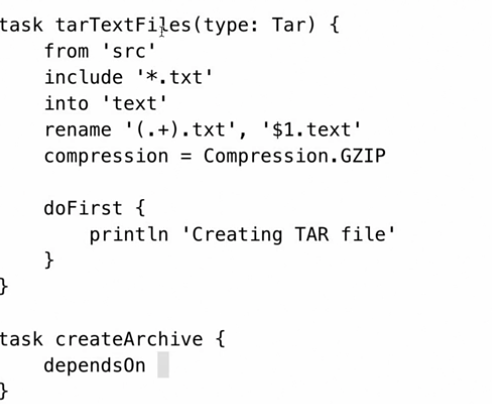
DAG cannot be modified once it’s been built and it’s in memory
Gradle for Java Developers
Let’s look at the structure of the example project:
- The
src/main/javafolder contains the Java source files. This is a common convention used by build tools like Maven and Gradle. - The
src/main/resourcesfolder holds resource files, like property or XML files, used at runtime. In this project, this folder is empty.
For example, the first argument specifies the function (like add), and the second and third arguments are the numbers to calculate.
To compile and run the code manually:
- Use the
javaccommand to compile the Java files, producing class files in theoutdirectory. - Use the
jarcommand to package the class files into a JAR file. - Run the application with the
javacommand, pointing to the JAR file.
default Java project configuration
 The Java plugin is a core Gradle plugin that comes with Gradle by default. It simplifies compiling, testing, and bundling Java source code without needing custom build logic. It provides conventions and sensible defaults, like where to find source code or where to store output artifacts. If needed, these defaults can be customized to accommodate legacy project structures.
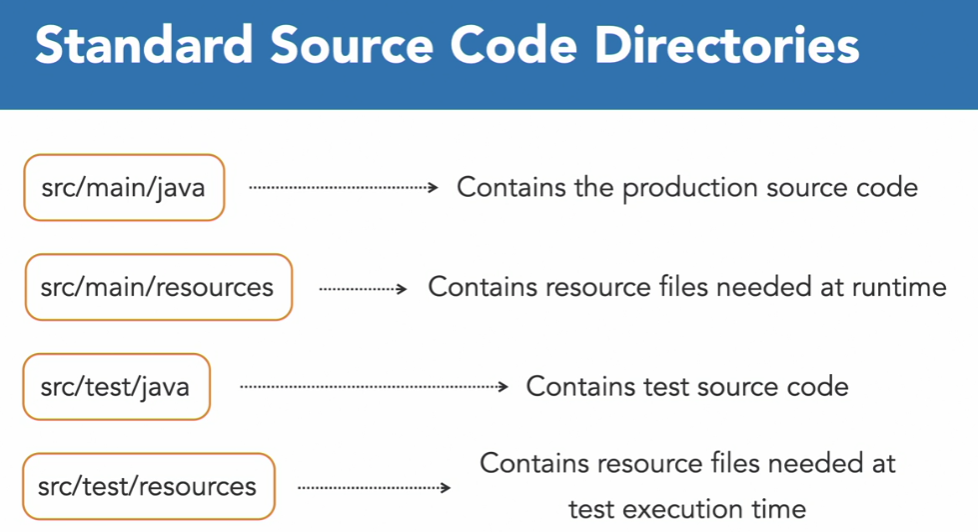
Here’s an overview of the typical directory structure for a Java project using the plugin:
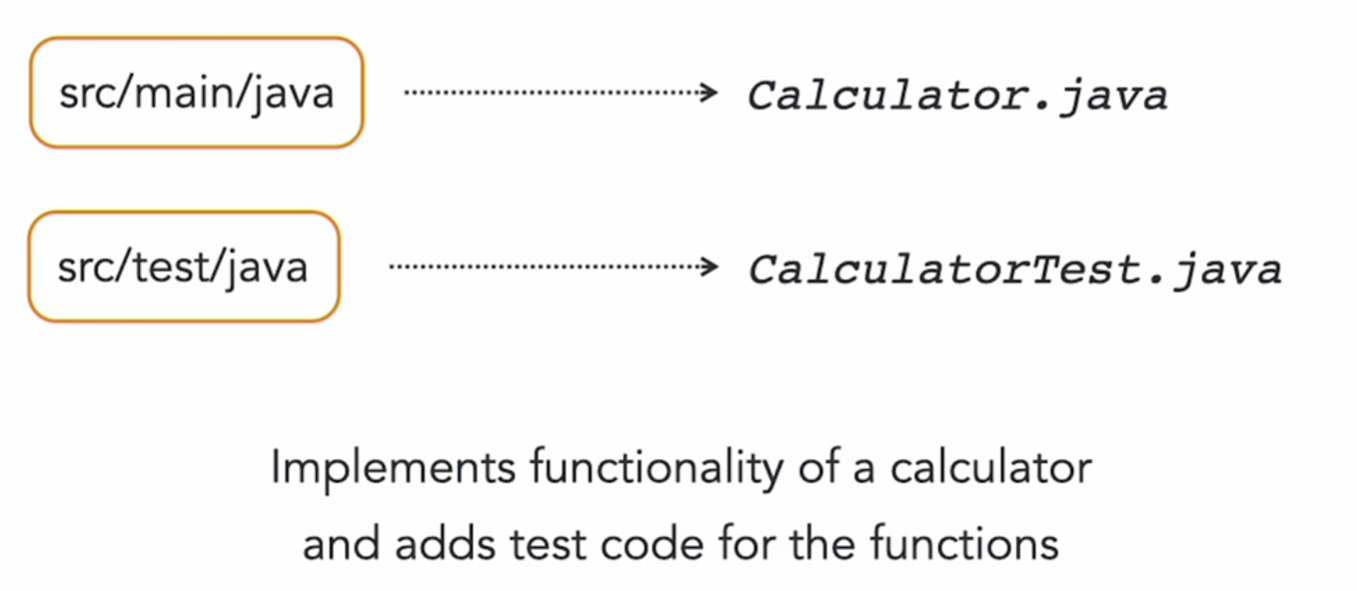
src/main/java: Contains production source code.src/main/resources: Contains resource files needed at runtime.src/test/java: Contains test source code.src/test/resources: Contains test resource files.
As long as your files are in these standard directories, the plugin will automatically detect and use them. Build artifacts, like class files and JARs, are stored in the build output directory.
The plugin also generates useful tasks for Java projects. You can call these tasks based on your use case.
To set up your project:
- Create a
build.gradlefile in the project root. - Apply the Java plugin by including
id 'java'in the file. - Add Gradle wrapper files to help other developers quickly set up the project.
Once this is done, run gradlew tasks to see a list of tasks provided by the plugin. You’ll find tasks for compiling, testing, and building your project.
Gradle Java plugin applies
Refer to https://docs.gradle.org/current/userguide/java_plugin.html
 As a Java developer, part of your workflow involves modifying source code to add features or fix bugs. At some point, you’ll need to compile the code to check if it can be converted into bytecode.
The Java plugin provides the compileJava task for this. Here’s how it works:
- Gradle looks for
.javafiles in thesrc/main/javadirectory. - It uses the Java version available on your system (as indicated by the
PATHenvironment variable) to compile the code. - Run the task with:
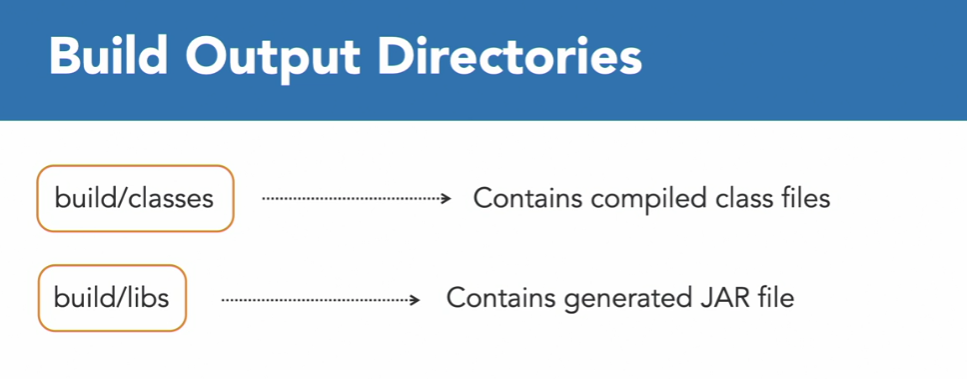
gradlew compileJava. - If there are no issues, the compiler generates
.classfiles, which are stored in thebuild/classesdirectory.
In addition to compiling, you also need to prepare resource files (e.g., configuration files) for runtime. The processResources task handles this by copying files from src/main/resources to the build directory. Since this project doesn’t include resource files, the task will show no source in the console output.
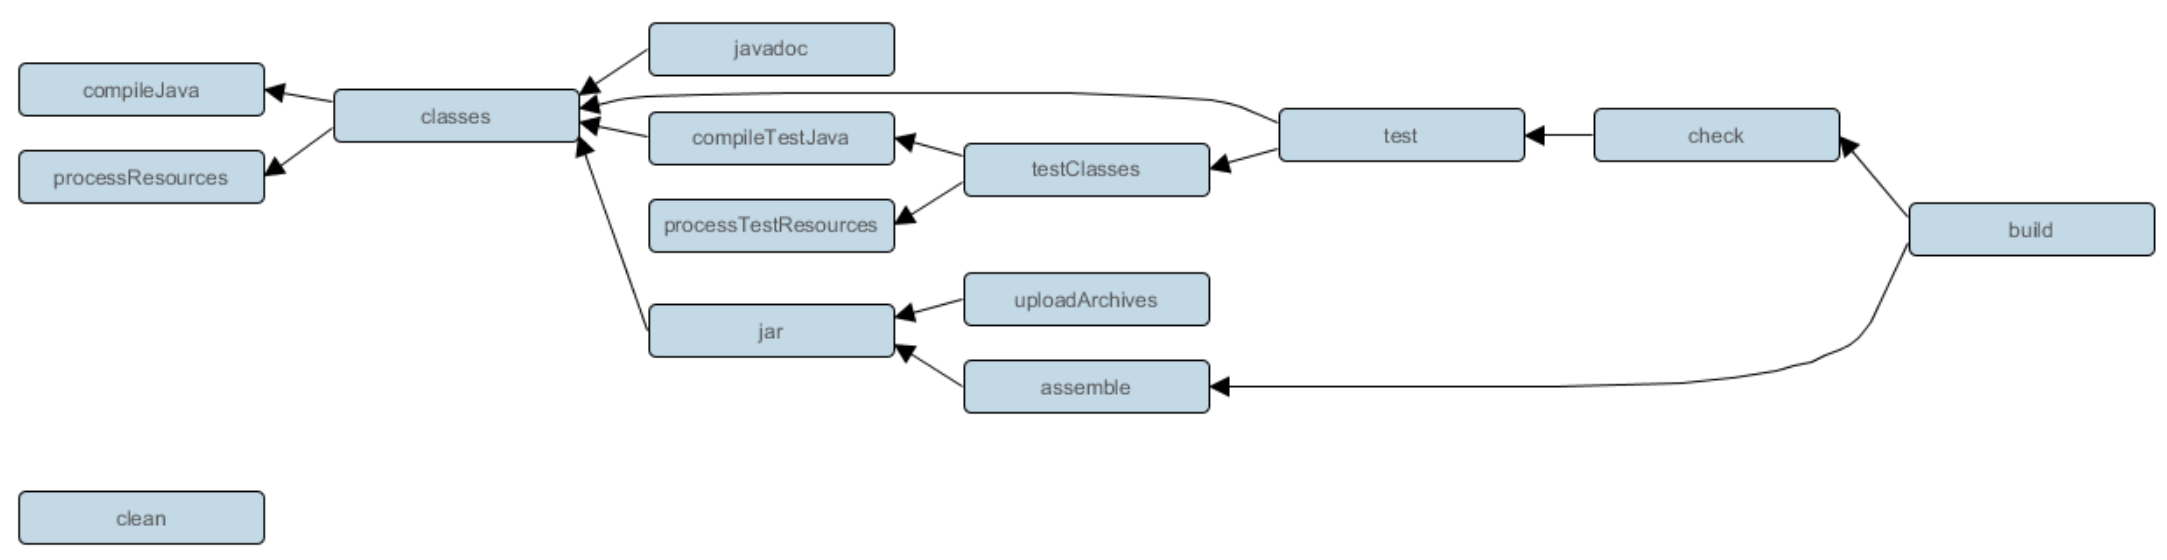
Running these tasks separately for every code change can be tedious. Instead, use the classes task, which combines both compileJava and processResources into a single command.
You can customize the compilation process as needed. For example:
- To set the Java version, specify source and target compatibility. For this project, we’ll use Java 11.
- Add the
-Werrorcompiler argument to treat warnings as errors and stop compilation if any occur.
These configurations can be set using the Java plugin’s extension. For more options, refer to Gradle’s DSL guide.
Gradle Java “Application” Plugin
In Java, you can build two main types of projects:
- Applications: Executable programs that users interact with.
- Libraries: Reusable functionality for other JVM programs.
We’ll focus on how Gradle helps create executable applications using the Application plugin.
The plugin supports two main use cases:
- Local Development: Use the
runtask to execute the program without building a distribution. - Creating Distributions: Use the
installDisttask to generate OS-specific scripts to start the program. You can also package the application into archives with thedistZipordistTartasks.
Steps
-
Apply the Application plugin in your Gradle file with:
plugins { id 'application' } -
Configure the
mainClass, which specifies the entry point of your program. For this example, the main class is:
com.linkedinlearning.calculator.Main.
Running the Application
To run the application, use the run task. Since our program requires arguments (the operation and two numbers), pass them with the --args option. For example:
gradlew run --args="add 1 2"This command calculates the sum of 1 and 2.
Creating a Shippable Program
To generate a distributable version of the application:
-
Run the
installDisttask:gradlew installDistThis creates a directory with all the files needed to run the application, including OS-specific startup scripts. You’ll find them in:
build/install/<project-name>. -
To bundle the application into an archive, use:
distZipfor a ZIP file.distTarfor a TAR file.
Further Configuration
The Application plugin provides detailed configuration options for fine-tuning. Refer to the Gradle user guide for more details.
Gradle and Dependency Management
The Java ecosystem has been around for decades, offering production-ready libraries for tasks like data management and security. Many popular open-source libraries are hosted on Maven Central, a widely used binary repository.
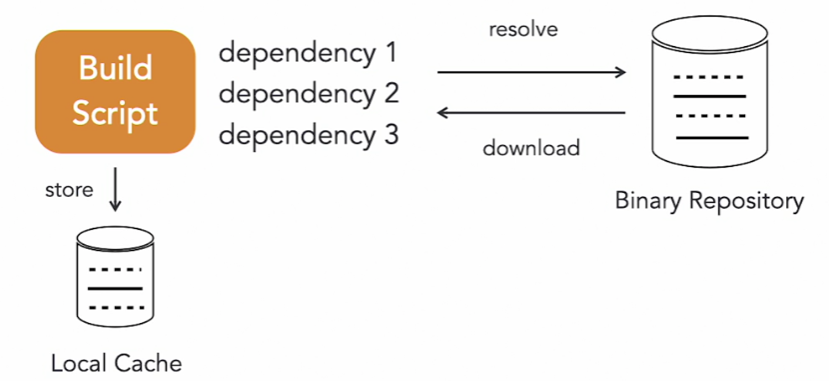
In a Gradle project, you can define dependencies from Maven Central or other repositories. At build time, Gradle:
- Downloads the required artifacts.
- Caches them locally for reuse.
- Adds them to the project’s classpath.
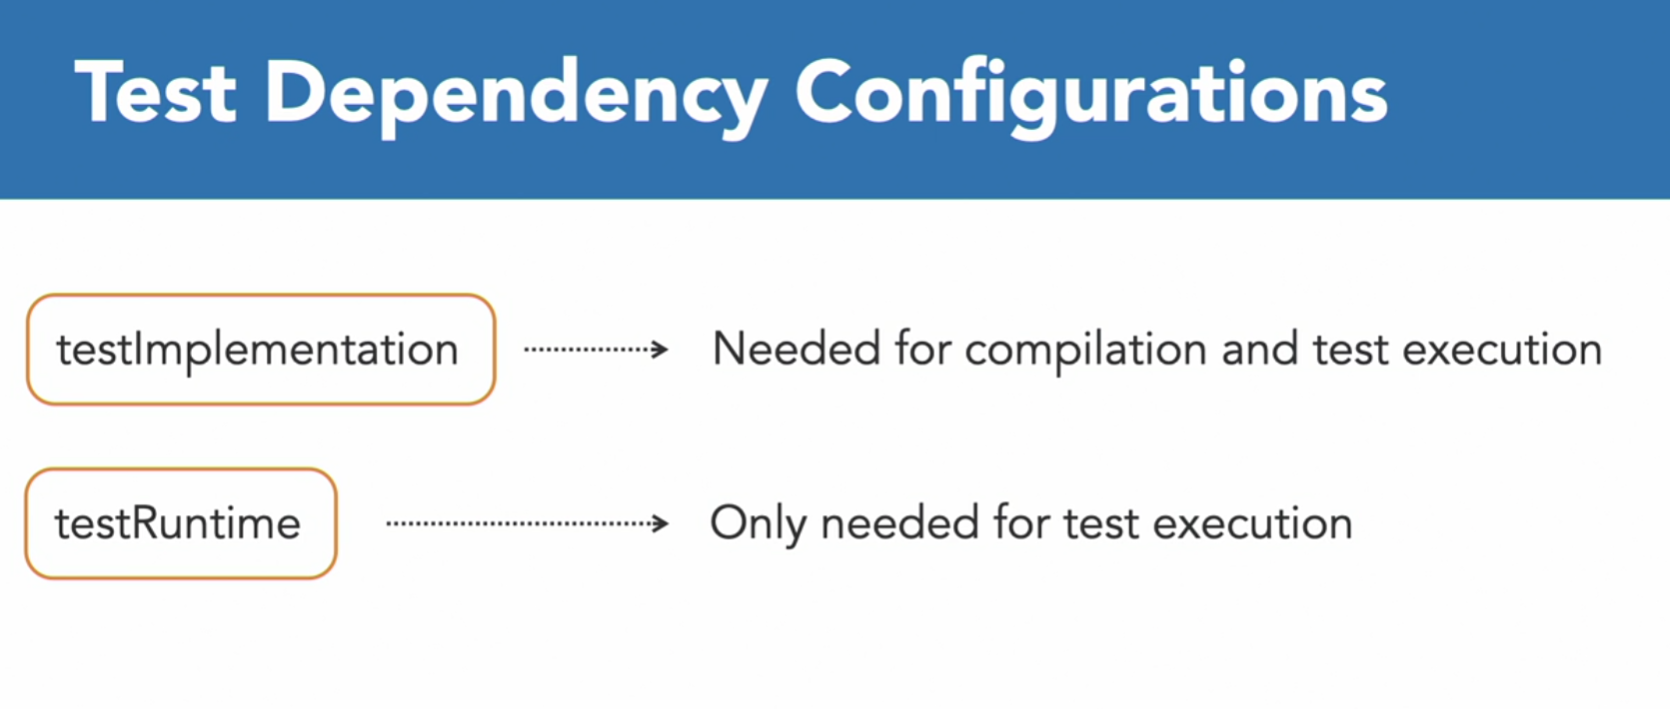
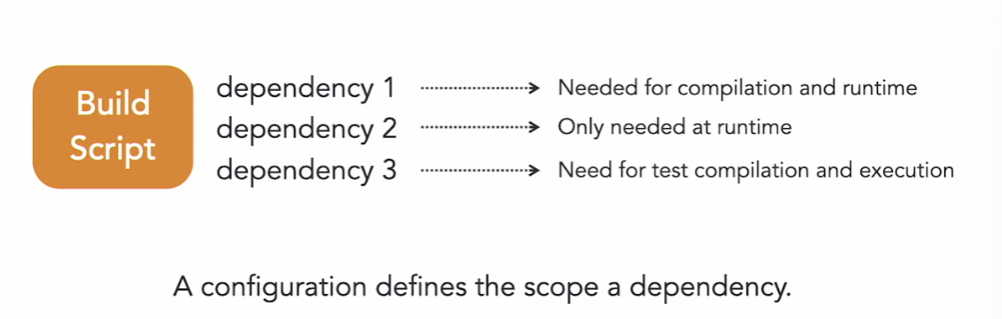
Gradle organizes dependencies into configurations, which define their scope. For example:
- A dependency can be required only at runtime but not during compilation.
Project Dependencies and Multi-Project Builds
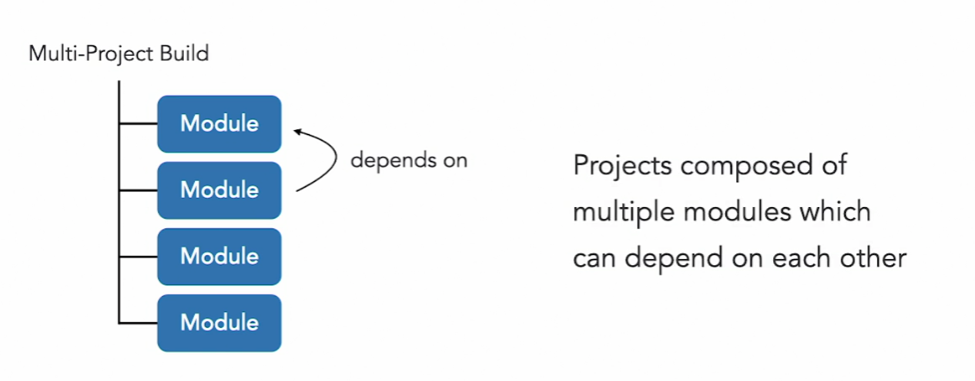 As your application grows more complex, you may want to divide it into functional modules or components. Each module is modelled as a Gradle project. Gradle supports this with multi-project builds, where a single project is composed of multiple sub-projects, each with its own logic and dependencies.
Publishing Libraries
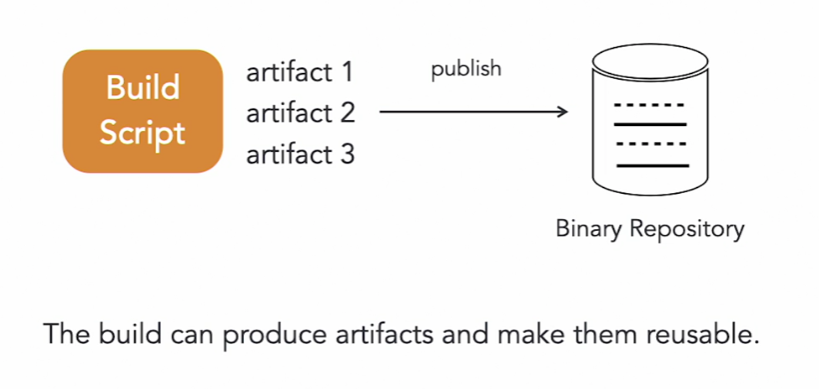 When your project is ready to ship, you’ll often produce a library or distribution. Gradle supports publishing Java libraries to Maven repositories, making them accessible to other developers or end-users.
GAV
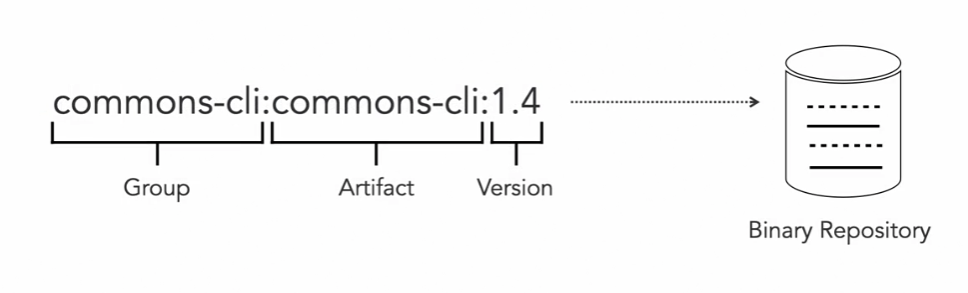
Declaring a Dependency on an External Library
To use an external library in a Java project, you need to understand three key aspects:
-
Dependency Coordinates
A dependency’s coordinates, also known as GAV (Group, Artifact, Version), identify the library. For example, let’s use thecommons-clilibrary to improve command-line option parsing in our program. -
Defining the Repository
To resolve the dependency, you must specify where Gradle should look. Use therepositoriesmethod and callmavenCentral()to declare Maven Central as the source repository. -
Adding the Dependency
- Define the dependency within the
dependenciesblock using its GAV (e.g.,commons-cli:commons-cli:1.4). - Use the
implementationscope to include the dependency for both compilation and runtime. This scope ensures the dependency is not exposed through your program’s public API. - If you need the dependency exposed via your program’s API (e.g., in method signatures), use the
apiscope instead.
- Define the dependency within the
Steps to Use the Library
- Import the classes from
commons-cliinto your code. - Compile the code or build the application using Gradle. Gradle will automatically download the dependency and include it in your program.
Testing the Library
- Run the task
installDistto build the application’s start scripts and library. - Navigate to the output directory.
- Execute the program and test the new command-line options enabled by
commons-cli.
Dependencies
Use the dependencies task to display the complete dependency tree for all configurations in the project.
- When you run the
dependenciestask:- Dependencies are grouped by configuration (e.g.,
implementation). - The
commons-clilibrary has no transitive dependencies, so the tree is simple. - Some configurations (like
runtimeClasspath) inherit dependencies from others, such asimplementation. s
- Dependencies are grouped by configuration (e.g.,
Adding a Dependency with Transitive
- To see transitive dependencies in action, let’s add
Spring Bootas a dependency. - Spring Boot includes a large set of transitive dependencies.
- After running the
dependenciestask, you’ll notice a much longer list. - Gradle automatically resolves, downloads, and adds these transitive dependencies because they are specified in the library’s metadata (e.g., its
pom.xml).
Analysing Dependencies
- Use the
dependencyInsighttask to investigate specific dependencies.- For example, it shows where a dependency is coming from and why it is included in the tree.
- This is helpful for troubleshooting dependency issues or optimizing your project.
For more details, refer to the Gradle User Guide, which covers advanced features not included here.
Publishing plugins
To make a library reusable by other projects, you need to publish it to a binary repository. Gradle makes this process easy with the Maven Publish plugin. Here’s how:
Steps to Publish a Library
- Apply the Plugin
- Add the Maven Publish plugin to your project by including the identifier
maven-publish.
- Add the Maven Publish plugin to your project by including the identifier
- Configure the Publication
- Use the plugin’s extension to define:
- The artifact to publish (e.g., the Java component, which is the JAR file created by the project).
- The group ID and artifact ID for identifying the library.
- The version, which is typically set at the root level of your project.
- Use the plugin’s extension to define:
- Define the Target Repository
- Specify where the artifact will be published.
- For simplicity, this example uses a directory within the project (
build/m2repo). - For real-world use, the target repository might be a service like Maven Central or Artifactory.
- Run the Publish Task
- Execute the
publishtask usinggradlew publish. - After the task completes, check the target directory for:
- The JAR file.
- The POM file (metadata for the artifact).
- Checksum files.
- Execute the
Publishing to Artifactory
- To publish to Artifactory:
- Update the repository URL to point to your Artifactory instance.
- Provide authentication credentials (e.g., username and password).
- Once configured, running the same
publishtask will upload the library to the specified repository.
With these steps, your library becomes available for consumption by other projects. For more advanced configurations, refer to Gradle’s official documentation.
Question 1 of 5
When publishing to a Maven repository, Gradle will only publish the JAR file. Is this a correct statement?
- No ⇒ The Maven publish plugin also publishes a POM file and checksum files.
How does Gradle group dependencies when running the “dependencies” task? by configuration - the dependency tree renders dependencies for all configurations available in the project.
Gradle Test