CommandLineRunner
In a Spring Boot application, a component that implements the CommandLineRunner interface is used to run specific logic after the application context has been initialized and the Spring application has started, but before the application is fully up and running.
Key Characteristics of CommandLineRunner
- Execution Timing: Runs immediately after the application context is fully loaded and before the
SpringApplication.run()method completes. - Purpose: Commonly used for tasks such as:
- Initializing application-specific resources.
- Loading test or default data into the database.
- Running diagnostics or configuration checks.
- Triggering certain actions at start-up.
How It Works
The CommandLineRunner interface has a single method, run(String... args), that needs to be implemented:
@FunctionalInterface
public interface CommandLineRunner {
    void run(String... args) throws Exception;
}
When Spring Boot starts, it automatically calls the run() method of any bean that implements this interface.
Example Usage
Here’s a simple example:
import org.springframework.boot.CommandLineRunner;
import org.springframework.stereotype.Component;

@Component
public class MyCommandLineRunner implements CommandLineRunner {

    @Override
    public void run(String... args) throws Exception {
        System.out.println("Application started! Performing initialization...");
        // Your custom logic here
    }
}
Example with Database Initialization
You can use CommandLineRunner to preload data into the database:
@Component
public class DatabaseSeeder implements CommandLineRunner {

    private final UserRepository userRepository;

    public DatabaseSeeder(UserRepository userRepository) {
        this.userRepository = userRepository;
    }

    @Override
    public void run(String... args) throws Exception {
        // Adding test users
        userRepository.save(new User("John", "Doe"));
        userRepository.save(new User("Jane", "Smith"));

        System.out.println("Database seeded with initial users!");
    }
}
Differences from ApplicationRunner
Spring Boot also provides the ApplicationRunner interface, which is similar to CommandLineRunner. The difference is that ApplicationRunner receives ApplicationArguments as its parameter, which provides a richer API for accessing arguments passed to the application.
Conclusion
A component implementing CommandLineRunner is a useful way to execute code at application startup, enabling custom initialization tasks or data setup. For more advanced needs, consider using ApplicationRunner or even event listeners like ApplicationReadyEvent or ContextRefreshedEvent.
Services
In a Spring Boot application, services are components that encapsulate the business logic of your application. They act as intermediaries between the controller (which handles incoming requests) and the data access layer (repositories or DAOs). This separation of concerns makes the application more modular, testable, and maintainable.
Characteristics of Services in Spring Boot
- Annotation: Services are typically annotated with
@Service. This annotation marks the class as a service component, allowing Spring to detect it during component scanning and register it as a Spring bean. - Role: Services contain the core business logic and often coordinate between different repositories, other services, or external APIs.
- Dependency Injection: Services use dependency injection to access required repositories or other beans.
Explanation of the Provided Code
BookService
public interface BookService {
    Iterable<Book> findAll();
}- Purpose: This is a service interface that defines the contract for any service that deals with
Bookentities. It declares a methodfindAll()to retrieve allBookrecords. - Benefits: Using an interface makes the service easier to test and more flexible for future changes, such as adding alternative implementations.
BookServiceImpl
@Service
public class BookServiceImpl implements BookService {

    private final BookRepository bookRepository;

    public BookServiceImpl(BookRepository bookRepository) {
        this.bookRepository = bookRepository;
    }

    @Override
    public Iterable<Book> findAll() {
        return bookRepository.findAll();
    }
}- Annotation: The
@Serviceannotation marks this class as a service component. - Dependency Injection: The
BookRepositoryis injected into the service through the constructor. This ensures the service can use the repository to interact with the database. - Business Logic: In this example, the business logic is minimal—it simply delegates the call to the repository’s
findAll()method. However, in a real application, this class might include validation, transformations, or other complex operations before returning data.
Flow Example
- A controller (e.g.,
BookController) will call thefindAll()method fromBookService. - The service (
BookServiceImpl) interacts with theBookRepositoryto retrieve the required data. - The service may apply business rules or logic before returning the result to the controller.
Why Use Services in Spring Boot?
- Separation of Concerns: Services separate business logic from web and data layers.
- Reusability: The same service can be reused across different controllers or components.
- Testability: Services can be unit-tested independently of the controller or repository.
- Scalability: Additional functionality can be added to the service layer without affecting other parts of the application.
Example Usage
Controller Example
@RestController
@RequestMapping("/books")
public class BookController {

    private final BookService bookService;

    public BookController(BookService bookService) {
        this.bookService = bookService;
    }

    @GetMapping
    public Iterable<Book> getAllBooks() {
        return bookService.findAll();
    }
}- The controller calls
bookService.findAll()to fetch all books. - The service handles the business logic and interacts with the repository.
This pattern of using services ensures clean code architecture and promotes the principles of Single Responsibility and Dependency Inversion.
MVC
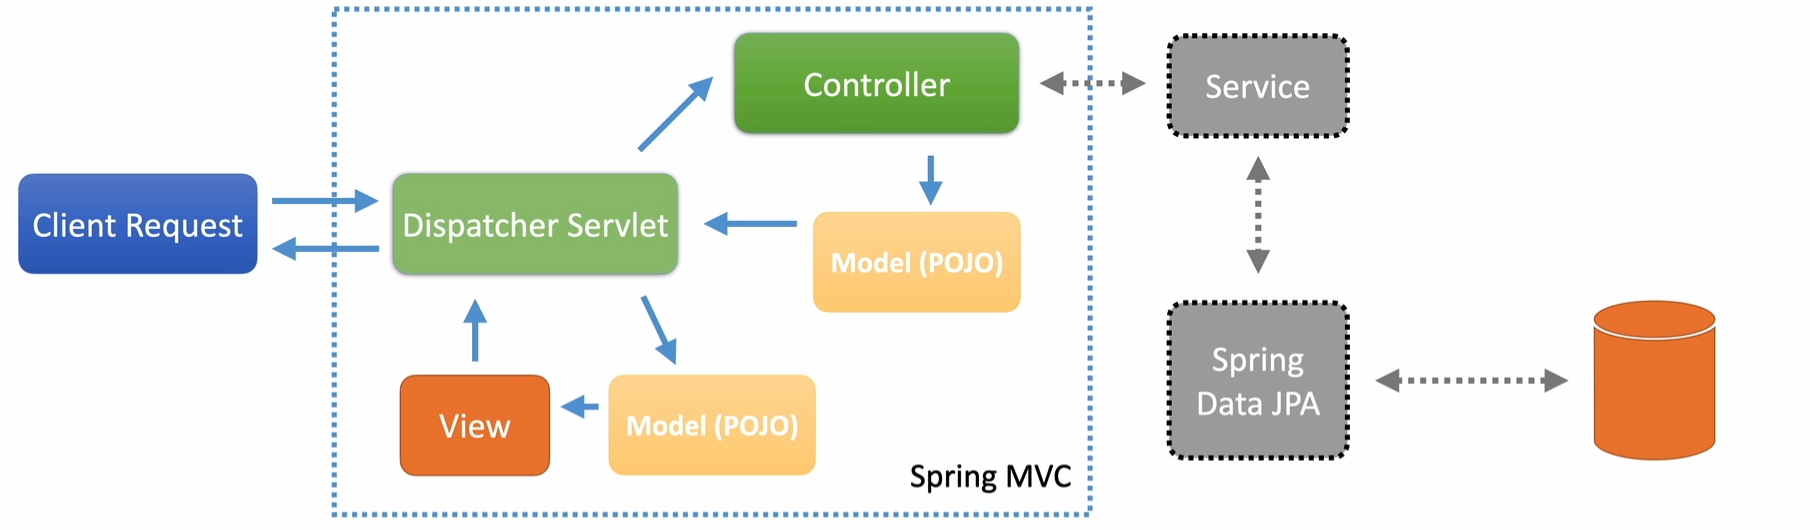
DTO
What are DTOs?
DTOs (Data Transfer Objects) are simple Java objects (POJOs) used to transfer data between producers and consumers. They’re designed to be lightweight data structures with minimal behavior—essentially just getters and setters. You’ll typically use DTOs in your controllers to expose data to clients or handle incoming requests.
How DTOs Fit into the Application
Imagine a typical Spring MVC structure with a controller, service layer, and repository:
- Repository and service layers work with entities, which represent database records.
- Controllers use DTOs to communicate with clients, producing JSON for responses and deserializing JSON into POJOs for requests.
This separation ensures clear responsibilities between layers.
Why Not Use Entities Directly?
For simple applications, you can use entities directly. For example, Spring Data REST allows exposing database entities directly as REST APIs. However, this has downsides:
- Data leakage: Sensitive or unnecessary data from your database might get exposed to clients.
- Diverging needs: As applications grow, the data requirements of the web layer (client-facing) and persistence layer (database-facing) often differ significantly.
- Needs of your customer is going to be different from what your database holds
DTOs address these issues by decoupling web-tier needs from persistence-tier details. They allow better optimization for serialization, deserialization, and specific client needs.
Type Conversions Between DTOs and Entities
Using DTOs requires converting data between DTOs and entities. This is common in Java applications and can become tedious if done manually. Best practices include:
- Avoid doing type conversions directly inside service methods—this violates the Single Responsibility Principle.
- Use dedicated converters to handle these transformations.
Converters and MapStruct
Spring provides a conversion service with an interface for defining converters. However, many developers prefer MapStruct, a tool that automates the generation of converters. Here’s how MapStruct works:
- You define an interface for the converter.
- During compilation, MapStruct generates the implementation.
- It works similarly to Lombok and can even create Spring-specific converters.
In this course, we’ll use MapStruct to manage conversions between DTOs and entities efficiently. Links to MapStruct documentation are provided in the resources.
Validation
Validation in Spring Boot: Best Practices and Techniques
Validation is a critical aspect of any application to ensure data integrity, security, and seamless user experience. In Spring Boot, validations are handled elegantly through annotations, controller-level validations, and JPA entity constraints. In this article, we will cover:
- Common validation annotations
- Validating DTOs at the controller level
- JPA entity validation
- Best practices for keeping validations consistent across layers
- Customizing validation error messages
- Testing validation logic effectively
Common Validation Annotations in Spring Boot
Spring Boot leverages Jakarta Bean Validation for validating data. Here are some common annotations:
@NotNull: Ensures a field is not null.@NotBlank: Ensures a field is not null and contains non-whitespace characters.@Size: Specifies the range of acceptable sizes for a field (e.g., string length or collection size).@Minand@Max: Define minimum and maximum values for numeric fields.
Example:
@Builder
@Data
public class BeerDTO {
    @NotBlank
    private String beerName;

    @NotNull
    private BeerStyle beerStyle;

    @NotNull
    @NotBlank
    private String upc;

    @NotNull
    private BigDecimal price;
}
Validation of DTOs at the Controller Level
The @Validated annotation ensures that DTOs are validated when passed to a controller endpoint. If validation fails, Spring Boot throws a MethodArgumentNotValidException.
Example:
    @PutMapping(BEER_PATH_ID)
    public ResponseEntity updateById(
	    @PathVariable("beerId") UUID beerId,
	    @Validated @RequestBody BeerDTO beer
	){
        if( beerService.updateBeerById(beerId, beer).isEmpty()){
            throw new NotFoundException();
        }
        return new ResponseEntity(HttpStatus.NO_CONTENT);
    }
Important
If
BeerDTOcontains invalid data (e.g., an emptybeerName), Spring Boot will return a400 Bad Requestresponse before reaching the service or persistence layers.
JPA Entity Validation
In addition to validating DTOs, it’s essential to validate the corresponding JPA entities to ensure database integrity. You can use the same annotations on your entity classes.
Example:
@Entity
public class Beer {
    @Id
    @GeneratedValue(strategy = GenerationType.AUTO)
    private UUID id;

    @NotBlank
    private String beerName;

    @NotNull
    private BeerStyle beerStyle;

    @NotNull
    @NotBlank
    private String upc;

    @NotNull
    private BigDecimal price;
}
Important
By aligning DTO and entity validations, you minimize the risk of mismatches and database constraint violations.
Best Practices for Consistent Validation
1. Keep DTO and Entity Validations Aligned
Ensuring that validations in DTOs mirror those in the corresponding entities reduces discrepancies and prevents issues when data reaches the persistence layer.
2. Customize Validation Error Messages
Human-readable error messages help users and developers alike. Messages should be descriptive enough to guide users but not expose sensitive details.
-
Controller-level validation: Customize messages in DTO annotations.
@NotBlank(message = "Beer name cannot be blank") private String beerName; -
JPA-level validation: Use the same approach as DTOs.
-
Custom exception handling: We can return 400 bad request for JPA validation instead of returning 500 internal server error.
@ControllerAdvice
public class CustomErrorController {

    @ExceptionHandler
    ResponseEntity handleJPAViolations(
	    TransactionSystemException exception
    ){
        return ResponseEntity.badRequest().build();
    }

    @ExceptionHandler(MethodArgumentNotValidException.class)
    ResponseEntity handleBindErrors(
	    MethodArgumentNotValidException exception
	){
        List errorList =
	        exception.getFieldErrors().stream()
                .map(fieldError -> {
                    Map<String, String > errorMap = new HashMap<>();
                    errorMap.put(
	                    fieldError.getField(),
	                    fieldError.getDefaultMessage()
	                );
                    return errorMap;
                }).collect(Collectors.toList());
        return ResponseEntity.badRequest().body(errorList);
    }
}
3. Balance Error Message Detail
Avoid exposing sensitive implementation details in error messages while still providing enough context for users. For example:
- Avoid: “ConstraintViolationException: upc cannot be null”
- Prefer: “UPC field is required”
Exception Flow Through Layers
Developers should think about how exceptions propagate through the application layers:
- Controller: Validations at this level catch user input errors early, preventing unnecessary processing.
- Service: Business logic errors can be handled here.
- Persistence: Validations at the database level act as the last safeguard.
Using explicit exception handling ensures that failures at any layer return meaningful, user-friendly error messages.
Testing Validation Logic
Properly testing validation is critical to ensure robustness. However there’s a fine line between over-testing and under-testing. Focus on:
-
Controller-level tests: Ensure invalid DTOs result in
400 Bad Requestresponses.@Test void testUpdateBeerBlankName() throws Exception { BeerDTO beer = new BeerDTO(); beer.setBeerName(""); // Invalid input mockMvc.perform(put("/beers/{beerId}", UUID.randomUUID()) .contentType(MediaType.APPLICATION_JSON) .content(objectMapper.writeValueAsString(beer))) .andExpect(status().isBadRequest()) .andExpect(jsonPath("$.length()", is(1))); } -
Repository-level tests: Validate database constraints are being caught.
@Test
void testPatchBeerInvalidName() throws Exception {
    Beer beer = beerRepository.findAll().get(0);

    Map<String, Object> beerMap = Map.of("beerName", "Invalid Name".repeat(20));

    mockMvc.perform(patch("/beers/{beerId}", beer.getId())
            .contentType(MediaType.APPLICATION_JSON)
            .content(objectMapper.writeValueAsString(beerMap)))
        .andExpect(status().isBadRequest());
}
Testing Tips:
- Avoid duplicating tests across layers.
- Test edge cases (e.g., null, empty strings, excessively long values).
- Ensure meaningful error messages for both valid and invalid scenarios.
Conclusion
Validation in Spring Boot is more than just adding annotations—it’s about maintaining consistency, customizing error messages, and thinking holistically about exception handling. By aligning validations at the DTO and entity levels and ensuring robust testing, you create reliable, maintainable, and user-friendly applications.
Adding database(MySQL) Dependency
- Dependency Addition:
- Scope should be set to
runtimein the Maven dependency configuration.
- Scope should be set to
- Spring Boot Auto-Configuration:
- By default, Spring Boot uses the H2 in-memory database if MySQL is not explicitly configured.
- Even after adding the MySQL dependency, H2 is used unless MySQL is enabled through profiles.
- Reason for H2 Usage:
- H2 is useful for testing due to its lightweight, in-memory nature.
- MySQL can be optionally activated for production or specific use cases.
Configuring MySQL Connection Properties
Create a profile-specific properties file, e.g., application-localmysql.properties:
spring:
  datasource:
    username: restadmin
    password: password
    url: jdbc:mysql://127.0.0.1:3306/restdb?useUnicode=true&characterEncoding=UTF-8&serverTimezone=UTC
    driver-class-name: com.mysql.cj.jdbc.Driver
  jpa:
    database: mysql
    hibernate:
      ddl-auto: update
    properties:
      hibernate:
        dialect: org.hibernate.dialect.MySQLDialect
        show_sql: true
        format_sql: true
Activating the Profile
- IntelliJ Configuration:
- In IntelliJ, edit the run configurations to set the active profile (e.g.,
localmysql). - This ensures the application uses the MySQL profile during startup.
- In IntelliJ, edit the run configurations to set the active profile (e.g.,
- Alternative Activation:
- Profiles can also be activated using:
- JVM arguments:
-Dspring.profiles.active=localmysql. - Configuration in the
application.propertiesfile.
- JVM arguments:
- Profiles can also be activated using:
Problems from using H2 along with MySQL
Important
When working with H2 and MySQL (or other databases), managing SQL dialects and data types can be challenging. Different databases often handle data types differently. For example, H2 might define a data type as varchar, while another database might use text or something else. These discrepancies require significant tweaking to ensure the data types match across databases.
Additionally, compatibility issues can arise between different versions of the databases. For instance, a newer version of H2 may not be fully compatible with your production database.
Recommendation
To avoid these issues, it’s best to use the same database type for both your tests and production environment. This ensures consistency and reduces the risk of mismatches during development and testing.
spring:
  datasource:
    username: restadmin
    password: password
    url: jdbc:mysql://127.0.0.1:3306/restdb?useUnicode=true&characterEncoding=UTF-8&serverTimezone=UTC
    driver-class-name: com.mysql.cj.jdbc.Driver
    hikari:
      pool-name: RestDB-Pool
      maximum-pool-size: 5
      data-source-properties:
        cachePrepStmts: true
        prepStmtCacheSize: 250
        prepStmtCacheSqlLimit: 2048
        useServerPrepStmts: true
        useLocalSessionState: true
        rewriteBatchedStatements: true
        cacheResultSetMetadata: true
        cacheServerConfiguration: true
        elideSetAutoCommits: true
        maintainTimeStats: false
  jpa:
    database: mysql
    hibernate:
      ddl-auto: update
    properties:
      hibernate:
        dialect: org.hibernate.dialect.MySQLDialect
        show_sql: true
        format_sql: true

logging:
  level:
    org:
      hibernate:
        orm:
          jdbc:
            bind: trace
Hikari to manage connection pool
Add below to your database configuration:
    hikari:
      pool-name: RestDB-Pool
      maximum-pool-size: 5
      data-source-properties:
        cachePrepStmts: true
        prepStmtCacheSize: 250
        prepStmtCacheSqlLimit: 2048
        useServerPrepStmts: true
        useLocalSessionState: true
        rewriteBatchedStatements: true
        cacheResultSetMetadata: true
        cacheServerConfiguration: true
        elideSetAutoCommits: true
        maintainTimeStats: false
Database initialization
-
JPA Database Initialization: Spring Boot provides properties to manage database initialization, including the Hibernate-specific
ddl-autoproperty. This property can be set to options likecreate,create-drop, andvalidate, withcreatebeing the default. In a production environment,validateis recommended for database integrity checks without making schema changes. -
Automatic Database Creation: In a development setting, Spring Boot and Hibernate can automatically create and initialize the database based on entity reflection. Files like
import.sql,schema.sql, anddata.sqlcan be used for initializing and populating the database. -
Control Over Initialization: While Spring Boot offers good control over initial database setup through these files, it lacks tools for ongoing database schema management, which becomes important in larger projects.
-
Migration Tools: The speaker recommends using a schema migration tool like Flyway or Liquibase for managing ongoing database changes. These tools provide a more robust solution for handling schema evolution, which is crucial for production environments and ongoing development.
-
Conclusion: For simple cases or initial development, using Spring Boot’s built-in database initialization can be sufficient. However, as the application evolves, migration tools like
Flywayare essential for managing database changes efficiently.
Schema generation behaviour in Hibernate
Below properties are used for controlling schema generation behavior in Hibernate. They automate schema creation and dropping during the application lifecycle, typically useful in development or testing environments. By using these properties, you can generate SQL scripts to recreate your database schema whenever the application starts.
spring:
  jpa:
    properties:
      jakarta:
        persistence:
          schema-generation:
            scripts:
              action: drop-and-create
              create-source: metadata
              drop-target: drop-and-create.sql
create-target: drop-and-create.sql-
spring.jpa.properties.jakarta.persistence.schema-generation.scripts.action
- Value:
drop-and-create - Explanation: Specifies the action to be taken when schema generation is performed. In this case, it tells Hibernate to drop the existing schema and recreate it. Other possible values are
create,drop, ornone, depending on the desired behavior.
- Value:
-
spring.jpa.properties.jakarta.persistence.schema-generation.scripts.create-source
- Value:
metadata - Explanation: Defines the source of the schema creation scripts. When set to
metadata, it generates the schema based on the JPA entity metadata (i.e., the structure defined in your Java classes, such as tables, columns, and relationships).
- Value:
-
spring.jpa.properties.jakarta.persistence.schema-generation.scripts.drop-target
- Value:
drop-and-create.sql - Explanation: Specifies the name of the file where the SQL commands to drop the schema will be written. In this case, the file
drop-and-create.sqlwill contain the SQL commands for dropping the schema.
- Value:
-
spring.jpa.properties.jakarta.persistence.schema-generation.scripts.create-target
- Value:
drop-and-create.sql - Explanation: Specifies the name of the file where the SQL commands to create the schema will be written. Here,
drop-and-create.sqlwill contain the SQL commands for creating the schema based on the JPA metadata.
- Value:
Database Migration
1. What Are Database Migrations?
- Migrations involve moving programming code from one system to another, specifically focusing on database migrations in this lecture.
- Proper coordination between database changes and application updates is critical to avoid runtime errors.
- In large organizations, developers usually do not perform migrations in production environments due to compliance and segregation of duties.
2. Why Use a Migration Tool?
- While Hibernate can handle database changes during local development, it is insufficient for managing permanent databases in environments like QA, UAT, and production.
- Migration tools provide:
- A way to track the state of the database.
- A reproducible and systematic process for applying schema changes across multiple database instances.
- Support for creating and managing new databases or environments.
3. Popular Migration Tools: Flyway and Liquibase
- Both tools share common features:
- Command-line tools.
- Integration with Maven, Gradle, and Spring Boot.
- Support for source-controlled change scripts and a database table to track applied changes.
- Commercial support availability.
- Differences:
- Liquibase supports multiple formats for change scripts (SQL, XML, YAML, JSON), making it suitable for complex enterprise environments.
- Flyway supports only SQL and Java scripts but is simpler, more lightweight, and widely adopted.
- Recommendation:
- Use Flyway for most applications due to its simplicity.
- Consider Liquibase for complex enterprise setups.
4. Flyway Features and Commands
- Key commands include:
- migrate: Applies migrations.
- clean: Removes all data and schemas.
- info: Displays applied and pending migrations.
- validate: Validates applied migrations against expected changes.
- undo: Undoes specific migrations (optional).
- baseline: Sets a baseline for an existing database.
- repair: Fixes migration metadata issues.
- Flyway can be used with the command-line interface or plugins for build tools like Maven and Gradle.
5. Using Flyway with Spring Boot
- Flyway integrates with Spring Boot, automatically applying migrations to the configured database on application startup.
- The lecture demonstrates setting up Flyway with Spring Boot, managing schema changes, and initializing new environments using Flyway.
6. Baseline Feature
- The baseline feature assumes an existing database schema and starts managing migrations from that point. However, the course focuses on starting from an empty database, allowing Flyway to fully manage all migrations.
Conclusion:
Flyway is a powerful, simple, and widely-used tool for managing database migrations, especially suited for smaller to medium-sized applications. The course will cover configuring Flyway with Spring Boot, applying migrations, and managing schema changes systematically.
Flyway
1. What is Flyway?
Flyway is a database migration tool that tracks and manages schema changes over time using migration scripts. It ensures consistency across development, testing, and production environments.
2. Setting Up Flyway
Prerequisites:
- A database (e.g., PostgreSQL, MySQL, H2, etc.)
- Flyway CLI, Maven, or Gradle installed
- Java Development Kit (JDK)
Installation
Using the CLI:
- Download Flyway from Flyway’s website.
- Unzip the archive and add the
flywayexecutable to your PATH.
Using Maven:
Add Flyway as a plugin in your pom.xml:
<plugin>
    <groupId>org.flywaydb</groupId>
    <artifactId>flyway-maven-plugin</artifactId>
    <version>9.22.1</version>
</plugin>
Using Gradle:
Add Flyway to your build.gradle file:
plugins {
    id 'org.flywaydb.flyway' version '9.22.1'
}
3. Configuring Flyway
Create a flyway.conf file or use application.properties for configuration. For a PostgreSQL example:
flyway.url=jdbc:postgresql://localhost:5432/my_database
flyway.user=my_user
flyway.password=my_password
flyway.schemas=public
flyway.locations=filesystem:db/migration- flyway.url: The JDBC URL of your database.
- flyway.user: Database user.
- flyway.password: Database password.
- flyway.locations: Directory where migration scripts are stored.
4. Writing Migration Scripts
Flyway uses a naming convention to identify migration scripts:
V<version>__<description>.sql
Example 1: Creating a Table
Filename: V1__Create_users_table.sql
CREATE TABLE users (
    id SERIAL PRIMARY KEY,
    username VARCHAR(50) NOT NULL,
    email VARCHAR(100) NOT NULL,
    created_at TIMESTAMP DEFAULT CURRENT_TIMESTAMP
);
Example 2: Adding a Column
Filename: V2__Add_phone_to_users.sql
ALTER TABLE users
ADD COLUMN phone VARCHAR(15);
Example 3: Seeding Initial Data
Filename: V3__Insert_initial_data.sql
INSERT INTO users (username, email) VALUES
('john_doe', 'john@example.com'),
('jane_doe', 'jane@example.com');
Save all these scripts in the directory specified in flyway.locations (e.g., db/migration).
5. Running Flyway Commands
Run Flyway commands via CLI, Maven, or Gradle to apply migrations.
Using the CLI:
Navigate to the Flyway directory and run:
flyway migrateUsing Maven:
mvn flyway:migrateUsing Gradle:
gradle flywayMigrateKey Commands:
- migrate: Applies new migrations.
- info: Lists applied and pending migrations.
- clean: Deletes all data and schemas (use carefully in non-production environments).
- validate: Ensures applied migrations match the expected state.
- repair: Fixes Flyway metadata.
6. Real-World Use Case
Scenario: Adding a “Roles” Table to Support Authorization
Suppose your application needs to add a roles table and assign roles to users.
Migration Script: V4__Create_roles_table.sql
CREATE TABLE roles (
    id SERIAL PRIMARY KEY,
    role_name VARCHAR(50) NOT NULL UNIQUE
);

INSERT INTO roles (role_name) VALUES
('Admin'),
('User'),
('Guest');
Migration Script: V5__Link_roles_to_users.sql
ALTER TABLE users
ADD COLUMN role_id INT REFERENCES roles(id);

UPDATE users SET role_id = 2 WHERE username = 'john_doe'; -- Assign "User" role
UPDATE users SET role_id = 1 WHERE username = 'jane_doe'; -- Assign "Admin" role
Run these scripts with:
flyway migrate7. Automating Flyway with Spring Boot
Flyway integrates seamlessly with Spring Boot. Add Flyway to your project dependencies:
Maven:
<dependency>
    <groupId>org.flywaydb</groupId>
    <artifactId>flyway-core</artifactId>
    <version>9.22.1</version>
</dependency>
Gradle:
implementation 'org.flywaydb:flyway-core:9.22.1'Flyway will automatically run migrations on application startup. Configure application.properties:
spring.flyway.url=jdbc:postgresql://localhost:5432/my_database
spring.flyway.user=my_user
spring.flyway.password=my_password
spring.flyway.baseline-on-migrate=true
8. Best Practices
- Use Version Control: Store migration scripts in your repository.
- Use Incremental Changes: Break schema changes into smaller, incremental migrations.
- Test Locally: Always test migration scripts in a local or staging environment.
- Keep Track of Migration History: Use Flyway’s metadata table (
flyway_schema_history). - Avoid Irreversible Changes: Be cautious with
DROPand destructive migrations. - Baseline Existing Databases: For legacy systems, use
flyway baseline.
9. Advanced Flyway Features
- Callbacks: Add pre- and post-migration hooks using Java or SQL scripts.
- Custom Migration Scripts: Write Java-based migrations for complex logic.
- Repair Metadata: Fix issues in Flyway’s metadata table with the
repaircommand.
Flyway simplifies database versioning, ensuring your schema evolves consistently across environments. It’s especially effective for projects that require reliable, automated database migrations.
Flyway Different Environment Dev, QA, Prod
Managing different environments (e.g., Local, Dev, QA, and Production) with Flyway requires careful configuration to ensure that migrations are applied correctly without interfering with each environment’s unique setup. Here’s a step-by-step guide to managing multiple environments with Flyway:
1. Separate Configuration for Each Environment
Flyway allows you to configure multiple environments using different configuration files or environment variables. Each environment should have its own database credentials and connection settings.
Example Configurations
Create a configuration file for each environment, such as:
Local: flyway-local.conf
flyway.url=jdbc:postgresql://localhost:5432/local_db
flyway.user=local_user
flyway.password=local_password
flyway.locations=filesystem:db/migration
Dev: flyway-dev.conf
flyway.url=jdbc:postgresql://dev-server:5432/dev_db
flyway.user=dev_user
flyway.password=dev_password
flyway.locations=filesystem:db/migration
QA: flyway-qa.conf
flyway.url=jdbc:postgresql://qa-server:5432/qa_db
flyway.user=qa_user
flyway.password=qa_password
flyway.locations=filesystem:db/migration
Production: flyway-prod.conf
flyway.url=jdbc:postgresql://prod-server:5432/prod_db
flyway.user=prod_user
flyway.password=prod_password
flyway.locations=filesystem:db/migration
2. Using Environment-Specific Commands
When running Flyway commands, specify the configuration file for the target environment.
CLI Example:
flyway -configFiles=flyway-local.conf migrate
flyway -configFiles=flyway-dev.conf migrate
flyway -configFiles=flyway-qa.conf migrate
flyway -configFiles=flyway-prod.conf migrate
Maven Example:
Add profiles for each environment in pom.xml:
<profiles>
    <profile>
        <id>local</id>
        <properties>
            <flyway.url>jdbc:postgresql://localhost:5432/local_db</flyway.url>
            <flyway.user>local_user</flyway.user>
            <flyway.password>local_password</flyway.password>
        </properties>
    </profile>
    <profile>
        <id>dev</id>
        <properties>
            <flyway.url>jdbc:postgresql://dev-server:5432/dev_db</flyway.url>
            <flyway.user>dev_user</flyway.user>
            <flyway.password>dev_password</flyway.password>
        </properties>
    </profile>
    <!-- Add QA and Prod profiles similarly -->
</profiles>
Run Flyway using Maven:
mvn -Plocal flyway:migrate
mvn -Pdev flyway:migrate
3. Environment Variables
You can use environment variables for sensitive information like database credentials.
Example:
export FLYWAY_URL=jdbc:postgresql://localhost:5432/local_db
export FLYWAY_USER=local_user
export FLYWAY_PASSWORD=local_password
flyway migrate
This avoids hardcoding sensitive details in configuration files.
4. Managing Shared Migrations
The migration scripts (db/migration directory) are typically shared across environments. Use a version-controlled repository to store these scripts and ensure they are consistent across all environments.
Best Practices for Shared Migrations:
- Use Consistent Naming: Follow the
V<version>__<description>.sqlconvention to avoid conflicts. - Review Scripts: Before applying a script in production, ensure it has been reviewed and tested in lower environments.
- Separate Test Data: Avoid adding test or environment-specific data in shared migration scripts. Use environment-specific seeding scripts if needed.
5. Managing Differences Across Environments
If environments require different configurations or data, use Flyway’s placeholders.
Placeholders:
Flyway supports placeholders for injecting environment-specific values into scripts.
Example Placeholder Script:
CREATE TABLE users (
    id SERIAL PRIMARY KEY,
    username VARCHAR(50) NOT NULL,
    email VARCHAR(100) NOT NULL,
    environment VARCHAR(50) DEFAULT '${env}'
);
Placeholder Configuration:
For Local:
flyway.placeholders.env=localFor Production:
flyway.placeholders.env=production6. Promotion Between Environments
Workflow:
- Apply migrations in the Local environment.
- Test the migrations in Dev.
- Validate migrations in QA.
- Apply the same migrations in Production.
Flyway ensures consistency by tracking applied migrations in the flyway_schema_history table. It prevents reapplying the same script or skipping scripts.
7. Validating Migrations
Run the validate command in each environment to ensure that all migrations are applied in the correct order:
flyway validateIf the validation fails, investigate discrepancies, fix the issues, and use the repair command if needed:
flyway repair8. Real-World Example
Scenario: Multi-Environment Deployment for a Feature
-
Local Development:
-
Create and test a migration script:
V1__Add_roles_table.sql. -
Apply it locally:
flyway -configFiles=flyway-local.conf migrate
-
-
Dev Environment:
-
Merge the script into the repository.
-
Apply migrations on the Dev server:
flyway -configFiles=flyway-dev.conf migrate
-
-
QA Environment:
-
Validate migrations in QA:
flyway -configFiles=flyway-qa.conf validate -
Apply migrations after approval:
flyway -configFiles=flyway-qa.conf migrate
-
-
Production:
-
Validate migrations in Production before applying:
flyway -configFiles=flyway-prod.conf validate -
Apply migrations:
flyway -configFiles=flyway-prod.conf migrate
-
9. Best Practices
- Always Test Locally and in Lower Environments First: Never apply untested migrations directly in production.
- Backup Databases: Always backup production databases before running migrations.
- Use CI/CD Pipelines: Automate migration deployments using CI/CD tools like Jenkins, GitHub Actions, or GitLab CI.
- Monitor and Log: Enable logging to track migration progress and troubleshoot failures.
By following these practices, Flyway can seamlessly manage migrations across Local, Dev, QA, and Production environments, ensuring your database evolves consistently with your application.
TestContainers
1. What is Testcontainers?
Testcontainers is a Java library that allows you to use lightweight, disposable Docker containers for testing. It integrates seamlessly with Spring Boot, making it perfect for testing against actual databases, message brokers, or other services.
2. Dependencies
To use Testcontainers with Spring Boot, include the following dependencies in your pom.xml:
<dependencies>
    <!-- Spring Boot Starter Test -->
    <dependency>
        <groupId>org.springframework.boot</groupId>
        <artifactId>spring-boot-starter-test</artifactId>
        <scope>test</scope>
        <exclusions>
            <exclusion>
                <groupId>org.junit.vintage</groupId>
                <artifactId>junit-vintage-engine</artifactId>
            </exclusion>
        </exclusions>
    </dependency>

    <!-- Testcontainers Core -->
    <dependency>
        <groupId>org.testcontainers</groupId>
        <artifactId>testcontainers</artifactId>
        <scope>test</scope>
    </dependency>

    <!-- Testcontainers MySQL -->
    <dependency>
        <groupId>org.testcontainers</groupId>
        <artifactId>mysql</artifactId>
        <scope>test</scope>
    </dependency>
</dependencies>
3. Configuration
Overview of Your Code
The code uses:
- @Testcontainers: To enable Testcontainers support in your test class.
- @ServiceConnection: To integrate the Testcontainers database with Spring Boot.
- @SpringBootTest: To load the full application context.
- BeerRepository: A JPA repository to interact with the
Beerentity.
4. Detailed Explanation of Your Test
Here’s how the code works and why each part is important:
4.1. Annotating with @Testcontainers
The @Testcontainers annotation ensures that Testcontainers will initialize and manage containers during the test lifecycle.
4.2. Using @Container
The @Container annotation marks a container to be started and stopped by Testcontainers. Here, you’re using the MySQLContainer class to spin up a MySQL database.
@Container
@ServiceConnection
static MySQLContainer<?> mySQLContainer = new MySQLContainer<>("mysql:9");mysql:9: The version of the MySQL Docker image.@ServiceConnection: Ensures that Spring Boot connects to the Testcontainers-provided MySQL instance.
4.3. Loading the Application Context
@SpringBootTest starts the application context, including your BeerRepository, which is injected into the test.
4.4. Writing the Test Logic
The test fetches all beers from the repository and asserts that the list is not empty.
@Test
void testListBeers() {
    List<Beer> beers = beerRepository.findAll();
    assertThat(beers.size()).isGreaterThan(0);
}
5. Tutorial: Setting Up and Adapting Testcontainers
5.1. Create Your Testcontainers Test
Ensure your application.properties or application.yml has an active profile for testing, such as localmysql.
Example: application-localmysql.properties
spring.datasource.url=jdbc:mysql://localhost/testdb
spring.datasource.username=test
spring.datasource.password=test
spring.datasource.driver-class-name=com.mysql.cj.jdbc.Driver
spring.jpa.hibernate.ddl-auto=create-drop
spring.jpa.show-sql=true
Updated Test Class
The example code is already configured to start the container and use the repository. If needed, add custom logic for populating the database during initialization.
@Testcontainers
@SpringBootTest
@ActiveProfiles("localmysql")
public class MySqlIT {

    @Container
    @ServiceConnection
    static MySQLContainer<?> mySQLContainer = new MySQLContainer<>("mysql:9")
            .withDatabaseName("testdb")
            .withUsername("test")
            .withPassword("test");

    @Autowired
    BeerRepository beerRepository;

    @Test
    void testListBeers() {
        // Prepopulate database if necessary
        Beer sampleBeer = new Beer("Sample Beer", "Lager", 5.0);
        beerRepository.save(sampleBeer);

        // Fetch beers
        List<Beer> beers = beerRepository.findAll();

        // Assertions
        assertThat(beers.size()).isGreaterThan(0);
        assertThat(beers.get(0).getName()).isEqualTo("Sample Beer");
    }
}
5.2. Populate the Database
Use the @BeforeEach or @BeforeAll lifecycle methods to insert sample data if necessary.
@BeforeEach
void setup() {
    beerRepository.save(new Beer("IPA", "Ale", 6.5));
    beerRepository.save(new Beer("Stout", "Dark", 7.5));
}
5.3. Run the Test
When you execute the test, the following happens:
- The
MySQLContainerstarts a disposable MySQL database in a Docker container. - Spring Boot connects to the Testcontainers database.
- The
BeerRepositoryinteracts with this database to retrieve and save data. - After the test, Testcontainers stops and removes the container.
6. Benefits
- Isolated Testing: Each test runs with a fresh MySQL instance.
- Realistic Environment: Tests use the actual MySQL database, reducing discrepancies between environments.
- Clean Up: Containers are automatically cleaned up after the test.
7. Advanced Usage
7.1. Adding Flyway/Liquibase
If you use Flyway or Liquibase for schema management, it will automatically apply migrations when Spring Boot starts.
7.2. Parallel Tests
Use unique database names for each test to prevent conflicts:
.withDatabaseName("testdb_" + UUID.randomUUID());7.3. Reusable Containers
Reuse containers across multiple tests to speed up execution:
TestcontainersConfiguration.getInstance().updateUserConfig("testcontainers.reuse.enable", "true");By using Testcontainers in your integration tests, you ensure that your application works seamlessly with MySQL in a controlled and predictable environment.
Performance Impact and Best Practices
Performance Benchmark
- Before Testcontainers: Tests ran in ~7 seconds.
- With Testcontainers: Tests now take ~16 seconds due to the time required to start up containers and wait for the database connection to become available.
Problem
- Testcontainers can slow down tests because of the overhead involved in initializing containers (e.g., MySQL).
- This impacts productivity, especially during test-driven development (TDD).
Solution: Using Maven Surefire and Failsafe Plugins
1. Surefire Plugin
- Runs unit tests, which are small, fast, and lightweight.
- Default includes: Tests with class names ending in
Test,test, orTestCase.
2. Failsafe Plugin
- Designed for integration tests, which are larger, slower, and bring up more dependencies.
- Default includes: Tests with class names ending in
IT,it, orITCase. - Runs during the
verifyphase of the Maven lifecycle.
Configuration Steps
Step 1: Modify Maven Configuration
-
Add the Failsafe plugin to your
pom.xml:<plugin> <groupId>org.apache.maven.plugins</groupId> <artifactId>maven-failsafe-plugin</artifactId> <version>3.x.x</version> <executions> <execution> <goals> <goal>integration-test</goal> <goal>verify</goal> </goals> </execution> </executions> </plugin>
Step 2: Refactor Test Classes
- Rename integration test files to match Failsafe’s default pattern, e.g., rename
MySQLTesttoMySQLIT. - Unit tests (e.g., using H2 in-memory database) remain under Surefire’s configuration.
Step 3: Run Tests Separately
- Unit Tests: Run with
mvn testto execute lightweight tests (e.g., H2 database). - Integration Tests: Run with
mvn verifyto execute heavier tests (e.g., MySQL with Testcontainers).
Results
- Unit Tests:
- Run time: ~7 seconds (no Testcontainers).
- Fast feedback during development.
- Integration Tests:
- Run time: ~18 seconds (includes container setup).
- Run less frequently to optimize build time.
Best Practices
- Separate Tests: Keep unit tests lightweight and integration tests heavier but infrequent.
- Use In-Memory Databases: For unit tests, use H2 or similar for faster execution.
- Leverage Maven Lifecycle: Use Surefire for unit tests and Failsafe for integration tests.
- Focus on Productivity: Balance test coverage and build time for optimal workflow.
By following these practices, you can effectively use Testcontainers while maintaining efficient development cycles.
TestContainers VS Native Spring Docker compose
Testcontainers and Spring Boot’s Docker Compose support both aim to simplify integration testing with containerized dependencies, but they have different use cases and strengths. Here’s a comparison to help you decide which one fits your needs.
Overview
Testcontainers
- A Java library that manages Docker containers for testing purposes.
- Supports programmatically starting and stopping containers within your test lifecycle.
- Designed to be lightweight, dynamic, and flexible for integration testing.
Spring Boot Docker Compose
- Native support in Spring Boot for integrating with Docker Compose.
- Automatically brings up a docker-compose.yml stack before tests or application startup.
- Aims to integrate with existing Docker Compose configurations.
Comparison
| Feature | Testcontainers | Spring Boot Docker Compose |
|---|---|---|
| Setup | Requires adding the Testcontainers dependency and configuring containers programmatically. | Relies on an existing docker-compose.yml file. |
| Ease of Use | Simple API for managing containers programmatically within your test code. | Automatic startup of services defined in Docker Compose. |
| Flexibility | Highly customizable. Supports dynamic port binding, custom network settings, and container configurations. | Limited flexibility as it depends on the static docker-compose.yml. |
| Scope | Designed for integration tests and can be scoped to individual tests. | Best for starting shared services for the entire application or test suite. |
| Test Granularity | Containers start/stop per test, per class, or globally (reusable). | All services in docker-compose.yml start together, usually for the entire suite or application lifecycle. |
| Dependency Management | Allows fine-grained control over containers (e.g., dynamically changing versions, parameters, etc.). | Static dependency definitions in docker-compose.yml. |
| Parallel Execution | Supports isolated containers for parallel test execution. | Parallel test execution may lead to conflicts if using the same docker-compose.yml stack. |
| Startup Performance | Slower for individual tests (container startup overhead), but reusable containers reduce this. | Faster if all services are required for the entire suite, but can be slower for small tests needing only one service. |
| Resource Consumption | Minimal as only required containers are started. | High, as all services in docker-compose.yml are started even if not all are needed for every test. |
| Integration | Works well with JUnit, Spock, and other Java testing frameworks. | Tight integration with Spring Boot, requires less configuration for Spring projects. |
| Use Cases | - Testing individual components in isolation. - Dynamic container setup during tests. | - Running full-stack tests that rely on a predefined Docker Compose stack. |
| Example Dependency | xml <dependency> <groupId>org.testcontainers</groupId> <artifactId>testcontainers</artifactId> <version>1.x.x</version> </dependency> | Natively supported in Spring Boot 3.x+ (no additional dependency required). |
When to Use Testcontainers
- You need dynamic container setups for individual tests.
- Tests require fine-grained control over container lifecycles (e.g., custom database setups for each test).
- You want to run isolated tests with minimal resource consumption.
- Ideal for microservice integration testing where dependencies differ between tests.
Example: Testcontainers with MySQL
@Container
private static MySQLContainer<?> mysql = new MySQLContainer<>("mysql:8.0")
        .withDatabaseName("testdb")
        .withUsername("test")
        .withPassword("password");

@Test
void testDatabaseConnection() {
    String jdbcUrl = mysql.getJdbcUrl();
    // Perform test using the database connection
}
When to Use Spring Boot Docker Compose
- Your project already uses Docker Compose for development or deployment.
- You want to test the entire application stack together (e.g., full system integration tests).
- You don’t need granular control over container lifecycles during tests.
- Simplifies testing when all required services are in a single
docker-compose.yml.
Example: Spring Boot with Docker Compose
-
docker-compose.yml:
version: "3.8" services: mysql: image: mysql:8.0 environment: MYSQL_ROOT_PASSWORD: root MYSQL_DATABASE: testdb -
application.yml:
spring: docker: compose: enabled: true -
Run the application or tests; Spring Boot handles starting the Docker Compose stack.
Which to Choose?
-
Choose Testcontainers if:
- You need flexible and isolated container setups per test.
- You’re testing microservices or APIs with varying dependencies.
- You need support for parallel testing or dynamic container parameters.
-
Choose Spring Boot Docker Compose if:
- You already have a
docker-compose.ymlstack for your application. - You want to test the application or a service as a whole with all dependencies running.
- You prefer minimal configuration for Spring-based applications.
- You already have a
Conclusion
- Testcontainers: Ideal for integration tests needing flexibility and dynamic setups.
- Spring Boot Docker Compose: Best for full-stack tests with existing
docker-compose.ymlsetups.
Evaluate your testing requirements (e.g., performance, granularity, and ease of use) to choose the right tool. You can even use both in the same project for different scenarios!