SOLID
Introduction to SOLID Principles in Object-Oriented Programming (OOP)
The SOLID principles are foundational guidelines for writing clean, maintainable, and testable code in OOP. Let’s break them down:
- History of SOLID Principles
- Introduced in March 1995 by Robert Martin (Uncle Bob).
- Initially shared through blogs and writings, later included in Martin’s book Agile Software Development Principles, Patterns, and Practices.
- The acronym “SOLID” was coined by Michael Feathers.
- What are the SOLID Principles?
These principles are:- Single Responsibility Principle (SRP)
- Open-Closed Principle (OCP)
- Liskov Substitution Principle (LSP)
- Interface Segregation Principle (ISP)
- Dependency Inversion Principle (DIP)
Single Responsibility Principle (SRP)
Every class should have one responsibility.
- A class should have only one reason to change.
- Keep classes small, ideally no more than a screenful of code.
- Avoid “God classes” that try to do everything.
- Split large classes into smaller ones for better testing and maintenance.
- Example: If you see a 2000-line method, something’s wrong—it’s impossible to test properly.
Open-Closed Principle (OCP)
Classes should be open for extension, but closed for modification.
- You should extend a class’s behavior without modifying its code.
- Use abstract base classes and private variables with getters/setters.
- Design classes to allow new features through extension without altering the existing code.

The phrase “Open Chest Surgery Is Not Needed When Putting On A Coat” is an analogy to explain the Open/Closed Principle (OCP). Here’s how it relates:
Open/Closed Principle Definition
- “Open for extension, closed for modification.”
- This means you can add new functionality (extend) to a class or module without altering its existing code (modifying).
The Analogy
Think of a class as a “chest” (representing the internal structure of code). The “coat” represents new functionality or behavior you want to add.
-
Bad Practice (violating OCP):
To add new functionality, you have to “open the chest,” exposing and altering the existing internal logic of the code. This can introduce bugs, destabilize the system, and make maintenance harder. -
Good Practice (adhering to OCP):
You simply “put on a coat” — extend the functionality by adding external layers, such as subclasses, decorators, or plugins, without directly modifying the internal logic of the original class.
Real-World Code Example:
Suppose you have a Shape class, and you need to add a new shape, say a Triangle.
-
Violating OCP:
Modify the existingShapeclass by adding new conditions (e.g., anifstatement) to handleTriangle. This is akin to “open chest surgery.” -
Following OCP:
Create a new subclassTrianglethat extendsShape. The originalShapeclass remains untouched. This is like “putting on a coat.”
By adhering to OCP, your code becomes easier to maintain, test, and extend, as you avoid unnecessary and risky modifications to existing code.
Liskov Substitution Principle (LSP)
 Objects of a superclass should be replaceable with objects of its subclass without altering correctness.
- Example: If a program expects a
Rectangle, you should be able to use aSquarewithout breaking the code. - Violations of this principle often fail during testing.
- Simple rule: A
Squareis aRectangle, but aRectangleis not always aSquare.
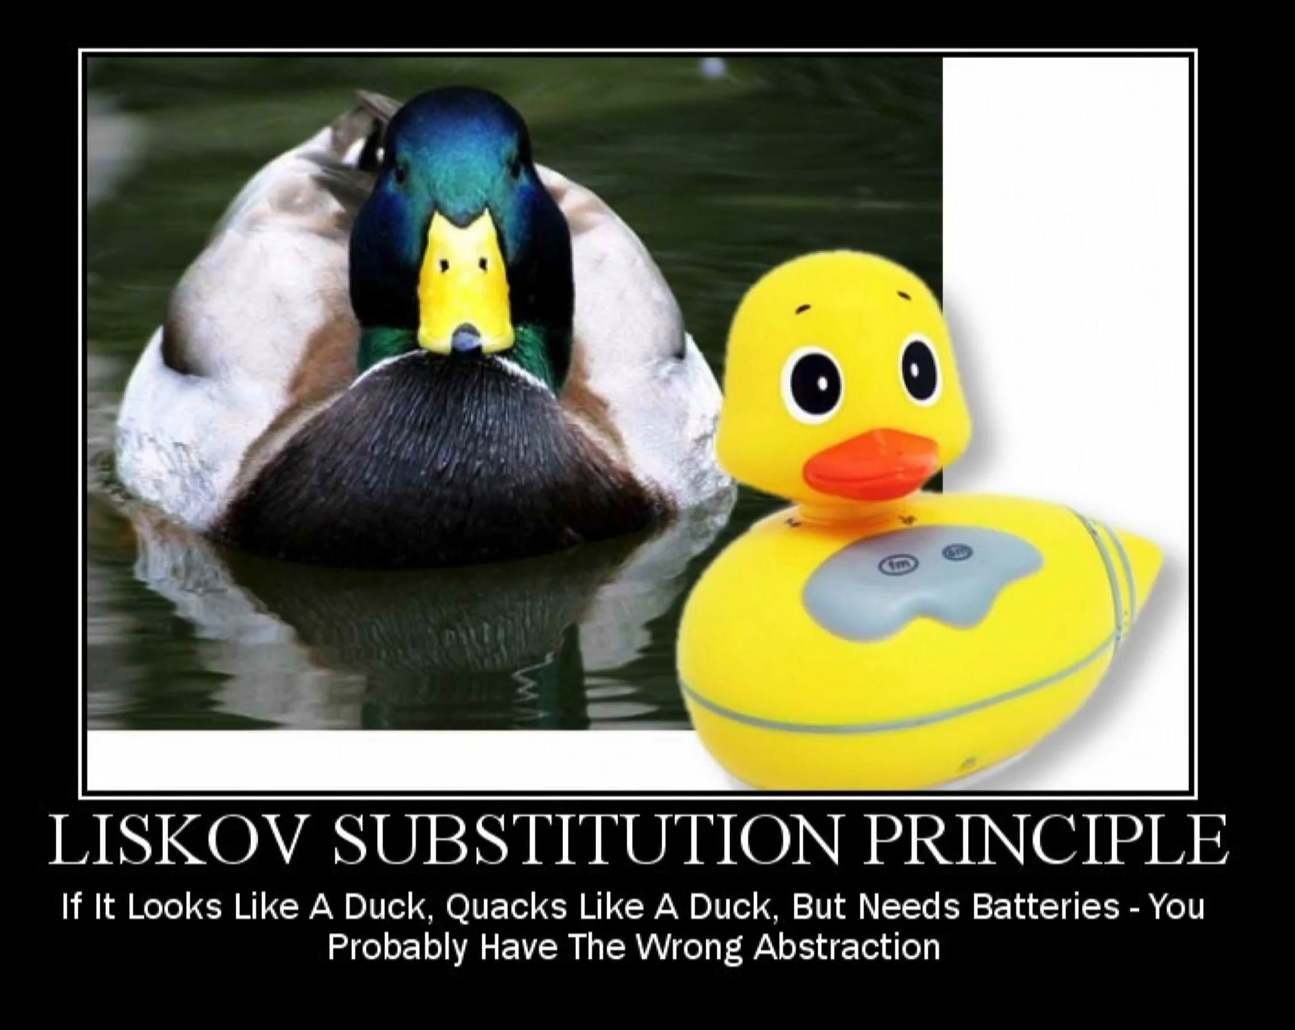
The phrase “If it looks like a duck, quacks like a duck, but needs batteries - you probably have the wrong abstraction” can indeed relate to the Liskov Substitution Principle (LSP) in object-oriented design. Let’s break down how this analogy ties into LSP.
What is the Liskov Substitution Principle (LSP)?
LSP is one of the five SOLID principles of object-oriented design, and it states that objects of a superclass should be replaceable with objects of a subclass without affecting the correctness of the program. In simpler terms, if you have a class Duck and a subclass RobotDuck, you should be able to use an instance of RobotDuck wherever you use an instance of Duck, without causing unexpected behavior.
Breakdown of the Analogy:
-
“Looks like a duck, quacks like a duck”:
This suggests that the object behaves as expected for aDuck— it has the expected properties or methods of a duck. It might have thequack()method, so it behaves like a duck in terms of its interface. -
“But needs batteries”:
This is the twist — while it appears to be a duck and quacks like a duck, it’s not truly a duck because it needs something extra (in this case, batteries) to function properly. This implies that the object does not fully adhere to the expectations of theDuckclass and its behavior.
How Does This Relate to Liskov Substitution Principle?
The core of the analogy is that the object appears to behave like a Duck, but it requires additional functionality that breaks the assumption of what it means to be a Duck. This is the key violation of Liskov Substitution Principle.
- If you have a class
Duck, you expect all instances ofDuck(including subclasses) to act like ducks in every situation where aDuckis expected. However, if you create a subclass likeRobotDuckthat looks and quacks like a duck but requires batteries, it violates LSP because it doesn’t fully adhere to the expectations of aDuck. TheRobotDuckrequires extra conditions to function, which means that it cannot be used interchangeably withDuckwithout changing the way the program works.
Example in Code:
Let’s imagine the following scenario:
-
Superclass: Duck
- Has a method
quack(). - A
Duckis a simple object that knows how to quack and swim.
- Has a method
-
Subclass: RobotDuck
- Also has a
quack()method but needs batteries to work properly. RobotDuckrequires additional setup or state to function, making it behave differently fromDuck.
- Also has a
Now, if you write code that relies on a Duck and expects it to just quack without needing extra setup, you could run into problems when substituting a RobotDuck for a Duck:
class Duck:
    def quack(self):
        print("Quack!")

class RobotDuck(Duck):
    def __init__(self):
        self.battery_level = 0

    def quack(self):
        if self.battery_level <= 0:
            print("Cannot quack, needs batteries!")
        else:
            print("Quack!")
In this example, if a RobotDuck is substituted where a Duck is expected, the behavior isn’t consistent. The RobotDuck may not quack unless it has batteries, violating LSP because:
- The subclass (
RobotDuck) does not fully behave as aDuckwhen used in the same context (it requires extra state — the battery). - Code that works with
Duckobjects might fail when it encounters aRobotDuck, unless it first checks for batteries.
Key Takeaway:
The analogy shows that a good subclass should behave exactly like its superclass without introducing unexpected behavior or extra requirements. In this case, if your abstraction “looks like a duck and quacks like a duck,” but requires something extra (batteries), it violates LSP because it does not fulfill the contract that a Duck (or any subclass of Duck) should be able to quack and behave as expected without additional setup. The principle advises that subclasses should be usable in place of their parent classes without altering expected behavior.
Interface Segregation Principle (ISP)
Prefer many specific interfaces over one general-purpose interface.
- Create fine-grained, client-specific interfaces.
- Avoid “God interfaces” that combine too much functionality.
- Example: Use interfaces to make components “plug-and-play,” allowing flexibility to swap them in and out without tight coupling.
Dependency Inversion Principle (DIP)
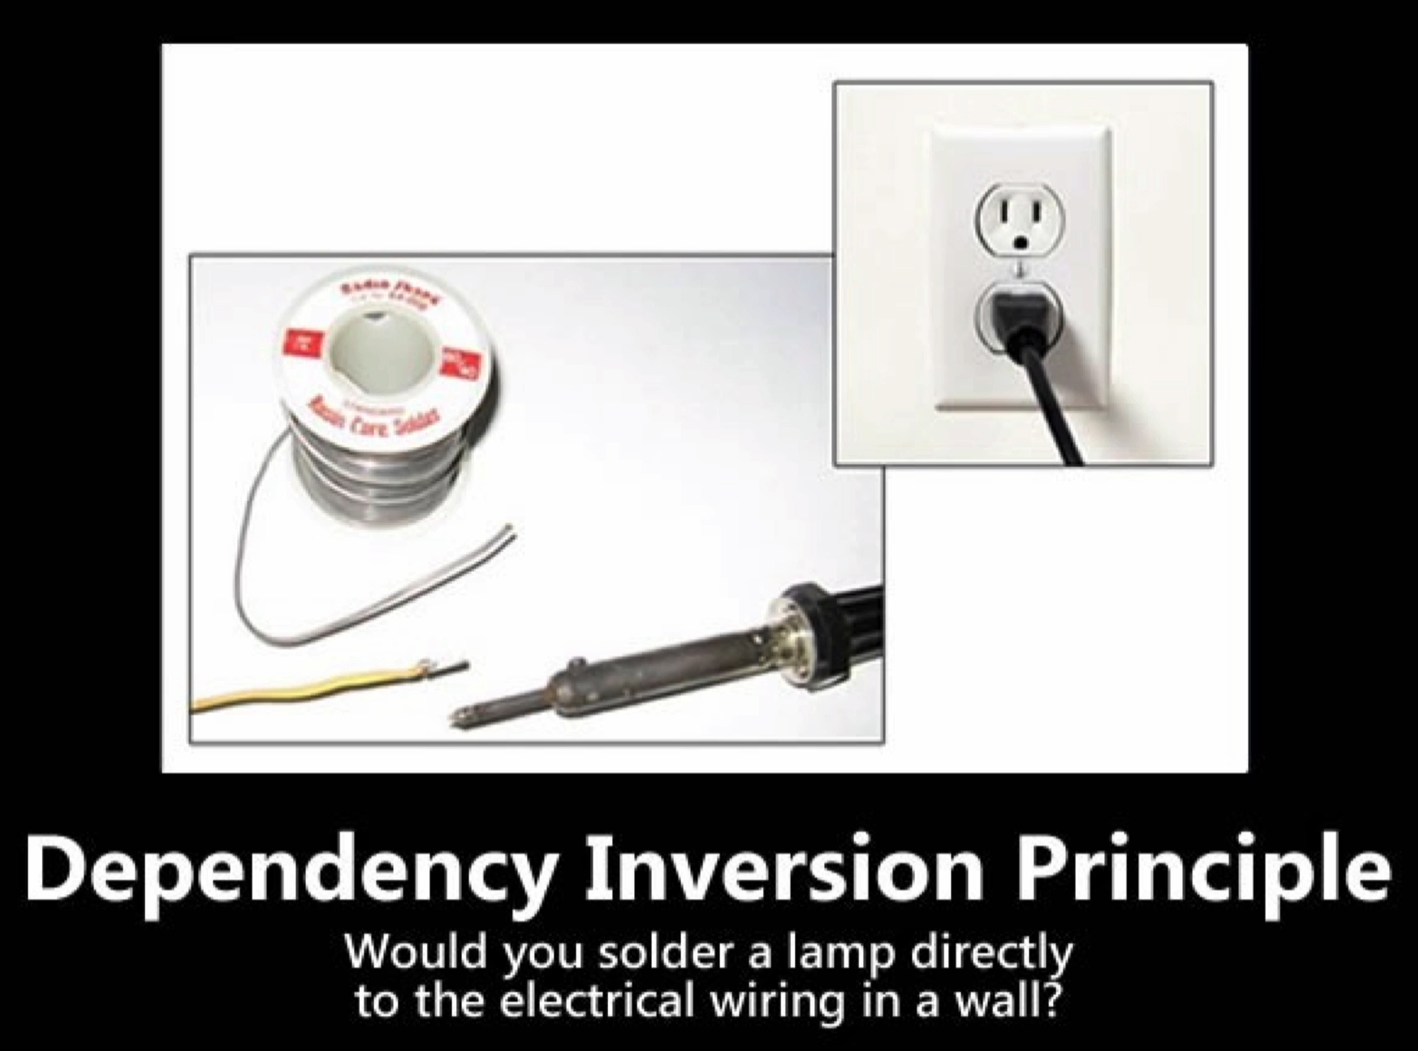 High-level modules should not depend on low-level modules. Both should depend on abstractions.
- Abstractions should not rely on details, and vice versa.
- Example: Think of a wall socket—it supports multiple devices (lamp, TV, radio) without knowing the specifics of each.
- This principle is different from dependency injection. It’s about designing abstractions that allow flexibility and prevent tight coupling.
Spring Context
In Spring Framework, the Spring Context is a core concept that provides a way to manage beans (objects) and their lifecycle within an application. It is essentially the environment or container that holds and manages the application’s configuration and objects, helping them to communicate with each other.
What is Spring Context?
The Spring Context refers to the mechanism that holds and manages beans (i.e., the components of your application) and provides services like dependency injection, event propagation, and lifecycle management.
Spring’s context is primarily provided by the ApplicationContext interface, which is a sub-interface of the BeanFactory interface. The ApplicationContext is the heart of the Spring container and contains the logic to load beans, wire them together, and provide essential application services. It can be thought of as a bean factory that also handles additional responsibilities such as internationalization, event propagation, and more.
In simpler terms, Spring Context is the environment that controls the configuration and behavior of the beans defined in your Spring application.
Key Components of Spring Context
-
Bean Definition:
Beans are objects that are managed by the Spring container. The context knows about the beans, their types, and how to instantiate and configure them. Beans can be defined through XML configuration, annotations, or Java-based configuration. -
Dependency Injection (DI):
The Spring Context manages dependency injection. It automatically injects the required dependencies into beans, reducing the need for manual wiring. This allows for decoupling of components and easier testing. -
ApplicationContext:
This is the central interface for the Spring Context. It is responsible for:- Loading bean definitions (via XML, annotations, JavaConfig).
- Instantiating and wiring beans.
- Managing bean scopes (singleton, prototype, etc.).
- Providing other features like internationalization (i18n), event handling, and more.
-
Beans:
These are the Java objects that Spring manages. A bean could be a service, repository, or any other type of object that Spring needs to manage for your application. These beans are defined in the Spring Context.
Step 1: Creating a Spring Controller
Let’s begin by creating a new package called controllers and adding a Java class named MyController. This class will be treated as a Spring bean.
@Controller
public class MyController {
    public String sayHello() {
        System.out.println("I'm in the controller");
        return "Hello Everyone";
    }
}- The
@Controllerannotation marksMyControlleras a Spring bean. - Even though we don’t have a web dependency (like Tomcat), Spring will still create this bean.
Step 2: Understanding Spring Boot’s Default Behavior
Spring Boot will automatically scan for components like @Controller within the package and its sub-packages. This is part of Spring Boot’s default behavior, which enables automatic component scanning.
Important
- If the annotation is placed outside the correct package, Spring might not find it.
- Ensure that the class is in the right package for Spring to detect it.
Step 3: Retrieving the Bean from the Spring Context
Now that we have defined the controller, we’ll retrieve the MyController bean from the Spring context.
@SpringBootApplication
public class Spring6DiApplication {
    public static void main(String[] args) {
        ApplicationContext ctx =
	        SpringApplication.run(Spring6DiApplication.class, args);

        MyController controller = ctx.getBean(MyController.class);

        System.out.println("In Main Method");
        System.out.println(controller.sayHello());
    }
}- The
ApplicationContext.getBean()method retrieves theMyControllerbean. - This allows us to use Spring’s dependency injection to access the controller and invoke its methods.
Step 4: Running the Application
When we run the Spring application, it will:
- Start the context and scan for annotated components.
- Create the bean and hold it in the context.
- When we request the
MyControllerbean, Spring will provide it.
Here’s the output you’ll see:
In the main method.
I'm in the controller.
Hello Everyone
- The first output is from the
mainmethod. - The second output is from the
sayHellomethod insideMyControllerthat gets returned.
Conclusion
This simple example demonstrates how Spring and the Spring context work together:
- Spring detects annotated components (like
@Controller). - It creates and holds beans in the Spring context.
- When we request a bean, Spring provides it, enabling dependency injection.
By using Spring Context, we can manage our beans and their dependencies more easily, promoting loose coupling and easier testing.
Spring Test Context
| Aspect | Spring ApplicationContext | Spring Test ApplicationContext |
|---|---|---|
| Purpose | Used in production or development applications. | Used exclusively in testing environments. |
| Scope | Manages beans throughout the entire application lifecycle. | Manages beans for the lifecycle of tests. |
| Features | - Full feature set: dependency injection, AOP, event publishing. - Works with production configurations. | - Provides test-specific annotations (@MockBean, @SpyBean). - Supports test-only configurations (@TestConfiguration). |
| Initialization | Loaded by application entry points: - SpringApplication.run(). - XML/Java configuration. | Loaded by test annotations: - @SpringBootTest, @WebMvcTest, @ContextConfiguration. |
| Bean Lifecycle Management | Initializes and manages all beans defined in the configuration for the entire application lifecycle. | Creates and manages beans for the scope of test execution. Can refresh with @DirtiesContext. |
| Performance | Optimized for long-running production use. | Optimized for short-lived test runs with context caching. |
| Caching | No caching of the context. | Caches and reuses test contexts across test classes to improve performance. |
| Testing Tools | Not designed for testing; requires manual mocking or configuration. | Provides tools for mocking (@MockBean, @SpyBean) and test-specific behavior. |
| Database Usage | Works with production databases or configuration. | Supports in-memory databases (e.g., H2) for testing. |
This table organizes the key differences between Spring ApplicationContext and Spring Test ApplicationContext for quick reference and comparison.
The difference between ApplicationContext (Spring Context) and Spring Test Context can be explained using the provided code and their roles in Spring and testing environments:
package guru.springframework.spring6di;

import guru.springframework.spring6di.controllers.MyController;
import org.junit.jupiter.api.Test;
import org.springframework.beans.factory.annotation.Autowired;
import org.springframework.boot.test.context.SpringBootTest;
import org.springframework.context.ApplicationContext;

@SpringBootTest
class Spring6DiApplicationTests {

    @Autowired
    ApplicationContext applicationContext;

    @Autowired
    MyController myController;

    @Test
    void testAutowireOfController() {
        System.out.println(myController.sayHello());
    }

    @Test
    void testGetControllerFromCtx() {
        MyController myController = applicationContext.getBean(MyController.class);

        System.out.println(myController.sayHello());
    }

    @Test
    void contextLoads() {
    }
}
1. Spring Context (ApplicationContext)
- Definition: The
ApplicationContextis the central interface in Spring for managing the lifecycle of beans, dependency injection, and application configuration. - Role in the Example:
- The
applicationContextfield in the example represents the Spring context. - It is autowired into the test class and allows direct access to all beans defined in the Spring configuration.
- The
Example Usage in Code:
@Autowired
ApplicationContext applicationContext;

@Test
void testGetControllerFromCtx() {
    MyController myController = applicationContext.getBean(MyController.class);
    System.out.println(myController.sayHello());
}- What Happens Here:
- The
applicationContext.getBean()method retrieves theMyControllerbean from the Spring Context. - This approach directly interacts with the Spring Context to fetch and use beans.
- The
2. Spring Test Context
- Definition: The Spring Test Context is a testing infrastructure provided by Spring for integration testing. It integrates with JUnit or TestNG and sets up a test-specific Spring Context.
- Role in the Example:
- The test class is annotated with
@SpringBootTest, which activates the Spring Test Context. - The Spring Test Context automatically:
- Boots up the Spring application context.
- Autowires beans (like
MyController) directly into the test class.
- The test class is annotated with
Example Usage in Code:
@Autowired
MyController myController;

@Test
void testAutowireOfController() {
    System.out.println(myController.sayHello());
}- What Happens Here:
- The Spring Test Context handles the lifecycle of the test-specific Spring context.
- The
@Autowiredannotation injects theMyControllerbean directly into themyControllerfield.
Key Differences
| Feature | Spring Context (ApplicationContext) | Spring Test Context (@SpringBootTest) |
|---|---|---|
| Definition | Core container for managing beans and DI. | Infrastructure for Spring integration tests. |
| Bean Retrieval | Explicitly fetch beans using getBean(). | Automatically autowires beans into test classes. |
| Scope | General application-wide context. | Test-specific, isolated Spring context. |
| Usage in Tests | Manual control over bean retrieval. | Automated bean management and lifecycle in test scenarios. |
| Performance | Context is fully managed at runtime. | Can restart or reuse context for test optimization. |
Why Use Both?
-
Direct Context Access (
ApplicationContext):- Useful when you need to programmatically interact with the Spring Context.
- Allows dynamic retrieval of beans that might not be autowired.
-
Test Context (
@SpringBootTest):- Simplifies test setup by automatically managing context creation, bean initialization, and dependency injection.
- Encourages cleaner test classes with minimal boilerplate.
Conclusion in the Example
- The
testAutowireOfControllermethod relies on the Spring Test Context to automatically inject theMyControllerbean. - The
testGetControllerFromCtxmethod directly interacts with the Spring Context (ApplicationContext) to manually retrieve theMyControllerbean. - Both approaches demonstrate the flexibility of Spring in managing beans and contexts, but the Spring Test Context (
@SpringBootTest) is more suited for integration testing scenarios.
DI
1. By Class Properties (Least Preferred)
- Properties can be public or private.
- Using private properties is discouraged as it:
- Relies on reflection, which is slow.
- Makes testing difficult.
- While it “works,” it’s not a recommended practice.
2. By Setters (Debatable)
- This method sparks a lot of debate among developers.
- It provides flexibility but may lack immutability.
3. By Constructor (Most Preferred)
- The best approach.
- Ensures immutability and clearly defines dependencies.
Dependency Injection: Concrete Classes vs. Interfaces
| Aspect | Concrete Classes | Interfaces |
|---|---|---|
| DI Usage | Can be used for Dependency Injection | Can be used for Dependency Injection |
| Recommendation | Should generally be avoided | Highly preferred |
| Flexibility | Tightly couples code to a specific class | Allows runtime to decide which implementation to inject |
| SOLID Principle | Violates the Interface Segregation Principle | Adheres to the Interface Segregation Principle |
| Testability | Makes testing harder (difficult to mock) | Makes testing easier (mocking is trivial) |
| Prefer using interfaces for Dependency Injection as they promote flexibility, adhere to SOLID principles, and enhance testability. |
Inversion of Control (IoC)
| Aspect | Explanation |
|---|---|
| Definition | Inversion of Control (IoC) is a technique that allows dependencies to be injected at runtime. |
| Key Feature | Dependencies are not predetermined but are provided by the framework at runtime. |
| Purpose | Enables the framework to control the application’s composition by deciding which implementation to inject. |
| Flexibility | Allows swapping implementations without changing the dependent code (e.g., H2 in-memory vs. MySQL). |
| Example | Injecting an H2 in-memory data source during development and switching to a MySQL data source in production. |
| IoC empowers frameworks to manage dependencies dynamically, making applications more modular, flexible, and easier to maintain. |
IoC vs Dependency Injection (DI)
Understanding the Difference:
- Dependency Injection (DI):
- Focuses on how classes are designed and composed.
- You create classes with the intention of injecting dependencies.
- Example: Writing code to explicitly inject a dependency into a class.
- Inversion of Control (IoC):
- Refers to the runtime environment of your application.
- Shifts the control of dependency management from your code to a framework.
- Example: In Spring, the framework manages the injection of dependencies.
Key Idea:
While DI is about structuring your code, IoC ensures that the framework takes control of injecting those dependencies at runtime.
When spring context is in doubt
PrimaryBean
When having multiple implementation and when we want to tell spring to which one to use when in doubt. We can mark it as primary.
Qualifiers
The @Qualifier annotation in the provided code is used to specify which bean should be injected when there are multiple beans of the same type available in the Spring application context.
Code Example:
@Controller
public class PropertyInjectedController {

    @Qualifier("propertyGreetingService") // Specifies the exact bean to inject
    @Autowired // Performs dependency injection
    GreetingService greetingService; // Field where the bean is injected

    public String sayHello() {
        return greetingService.sayGreeting();
    }
}@Autowired:- Automatically injects a bean of type
GreetingServiceinto thegreetingServicefield. - If there are multiple beans of type
GreetingServicein the Spring Context, Spring will not know which one to inject, and this will lead to a conflict.
- Automatically injects a bean of type
@Qualifier:- Resolves the ambiguity by specifying the exact bean name that Spring should inject.
- In this case, the
@Qualifier("propertyGreetingService")tells Spring to use the bean namedpropertyGreetingService.
Why Use @Qualifier?
-
Avoiding Ambiguity: If multiple beans of the same type (
GreetingService) are available, Spring doesn’t know which one to inject. Using@Qualifiereliminates this ambiguity by selecting the specific bean. -
Example Scenario:
@Service("propertyGreetingService") public class PropertyGreetingService implements GreetingService { @Override public String sayGreeting() { return "Hello from Property Greeting Service!"; } } @Service("setterGreetingService") public class SetterGreetingService implements GreetingService { @Override public String sayGreeting() { return "Hello from Setter Greeting Service!"; } }- Without
@Qualifier, Spring would throw an exception because it finds two beans (propertyGreetingServiceandsetterGreetingService) of typeGreetingService.
- Without
-
Ensuring Specific Behavior: Allows the developer to select a bean that implements a specific business logic.
What Happens Without @Qualifier?
- Single Bean: If there’s only one bean of type
GreetingService, Spring will inject it without requiring@Qualifier. - Multiple Beans: Spring throws an
org.springframework.beans.factory.NoUniqueBeanDefinitionExceptionbecause it cannot decide which bean to inject.
Key Notes about @Qualifier
- Bean Name: The value of the
@Qualifierannotation (e.g.,"propertyGreetingService") should match the name of the bean. - Combination with
@Autowired: The@Qualifierworks together with@Autowiredto refine the injection process. - Field, Constructor, or Method: You can use
@Qualifieron fields, constructors, or setter methods to specify the bean to be injected.
Summary
In the given code:
- The
@Qualifier("propertyGreetingService")ensures that thePropertyInjectedControllerspecifically uses thepropertyGreetingServicebean when multiple beans of typeGreetingServiceare available. - It provides clarity and control over which implementation is injected, making the application behavior predictable and consistent.
Profiles
In the provided code, the @Profile annotation in Spring is used to define environment-specific configurations. It allows you to activate or deactivate beans based on the currently active profile in your Spring application.
How the Code Works
SpanishGreetingService:
@Profile("ES") // This bean is active only when the "ES" profile is active
@Service("i18NService")
public class SpanishGreetingService implements GreetingService {
    @Override
    public String sayGreeting() {
        return "Hola Mundo - ES";
    }
}- This bean will only be loaded into the Spring Application Context when the “ES” profile is active.
EnglishGreetingService:
@Profile({"EN", "default"}) // This bean is active when "EN" or "default" profiles are active
@Service("i18NService")
public class EnglishGreetingService implements GreetingService {
    @Override
    public String sayGreeting() {
        return "Hello World - EN";
    }
}- This bean will be active when the “EN” profile or the default profile (if no other profile is specified) is active.
What Does a Spring Profile Do?
-
Conditional Bean Loading:
- The
@Profileannotation specifies which profile(s) must be active for the annotated bean to be loaded into the Spring Application Context. - If a profile does not match the active profile(s), the corresponding bean will not be instantiated or registered.
- The
-
Environment-Specific Behavior:
- Profiles are commonly used to define environment-specific beans (e.g.,
dev,test,prod) or to provide different implementations for a service based on context.
- Profiles are commonly used to define environment-specific beans (e.g.,
-
Profile Activation:
- Profiles can be activated via:
- Application properties or YAML:
spring.profiles.active=ES- Command-line argument:
java -Dspring.profiles.active=EN -jar your-application.jar - Programmatically:
ConfigurableApplicationContext context = new SpringApplicationBuilder(App.class)
    .profiles("ES")
    .run(args);
- Profiles can be activated via:
-
Fallback Profile:
- The
defaultprofile is used if no specific profile is activated, making it a safe fallback configuration.
- The
@Profile({"EN", "default"})   // will use EN as default if none is selected
@Service("i18NService")
public class EnglishGreetingService implements GreetingService {
    @Override
    public String sayGreeting() {
        return "Hello World - EN";
    }
}
How This Code Operates
- When the “ES” Profile is Active:
- The
SpanishGreetingServicebean is loaded as the implementation of thei18NService. - Any autowiring of
@Autowired @Qualifier("i18NService")or direct calls toapplicationContext.getBean("i18NService")will resolve toSpanishGreetingService.
- The
- When the “EN” Profile is Active:
- The
EnglishGreetingServicebean is loaded as the implementation of thei18NService.
- The
- When No Profile or “default” Profile is Active:
- The
EnglishGreetingServicebean is loaded by default, as it is associated with the “default” profile.
- The
- When Multiple Profiles Are Specified:
- Only one bean will be active based on the profile precedence.
Why Use Profiles?
- Environment-Specific Configurations:
- Example: Use different data sources for development and production environments.
- Different Implementations:
- Example: Provide localized services like Spanish or English greetings.
- Testing Scenarios:
- Example: Use mock implementations of services for tests.
- Feature Toggles:
- Example: Enable or disable certain features during development.
Summary
@ProfileAnnotation: Controls which bean is loaded into the Spring Context based on the active profile.- In the Example:
SpanishGreetingServiceis used when the “ES” profile is active.EnglishGreetingServiceis used when the “EN” or “default” profile is active.
- Usage: Profiles allow flexible, environment-specific configurations, enabling Spring applications to behave differently in development, testing, and production environments.
Spring Bean Lifecycle
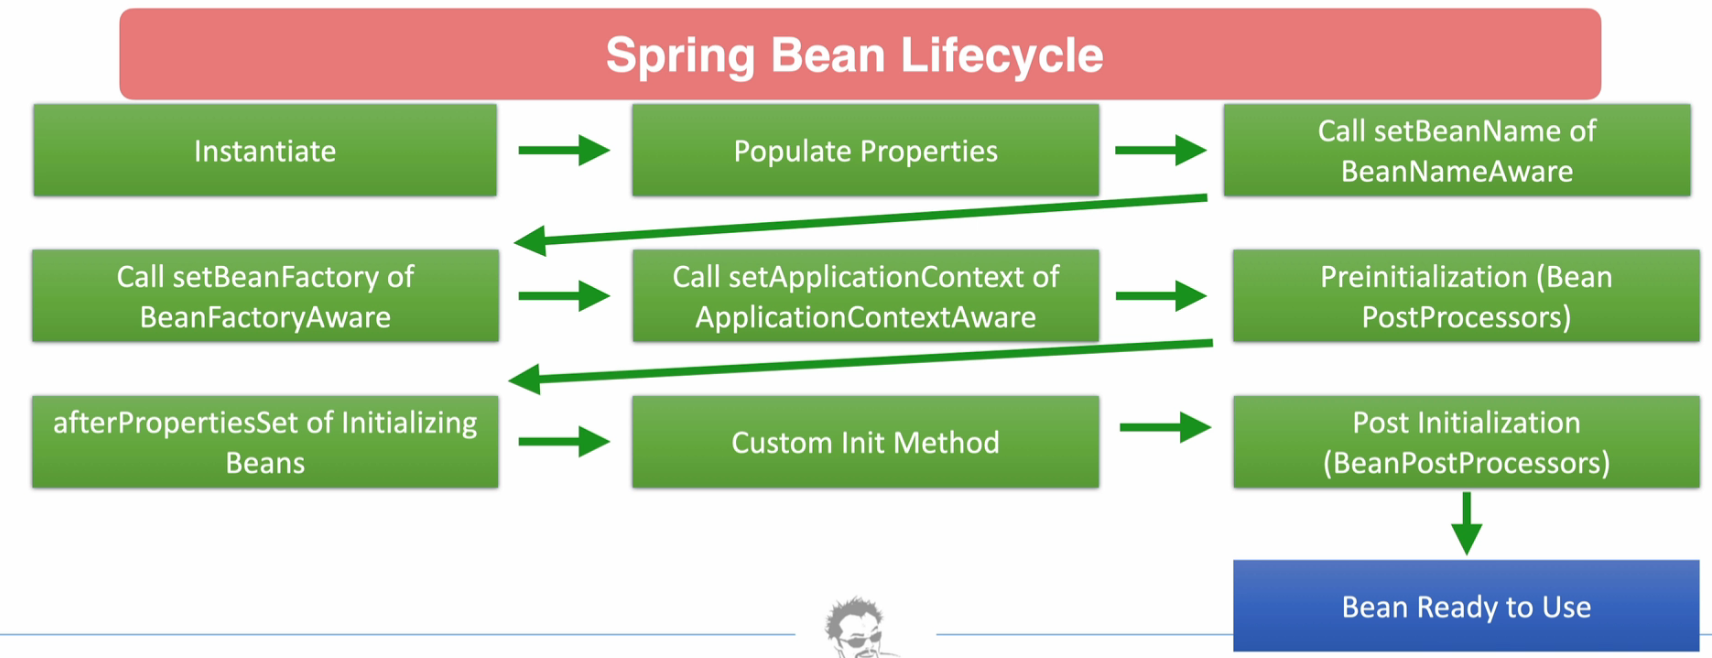
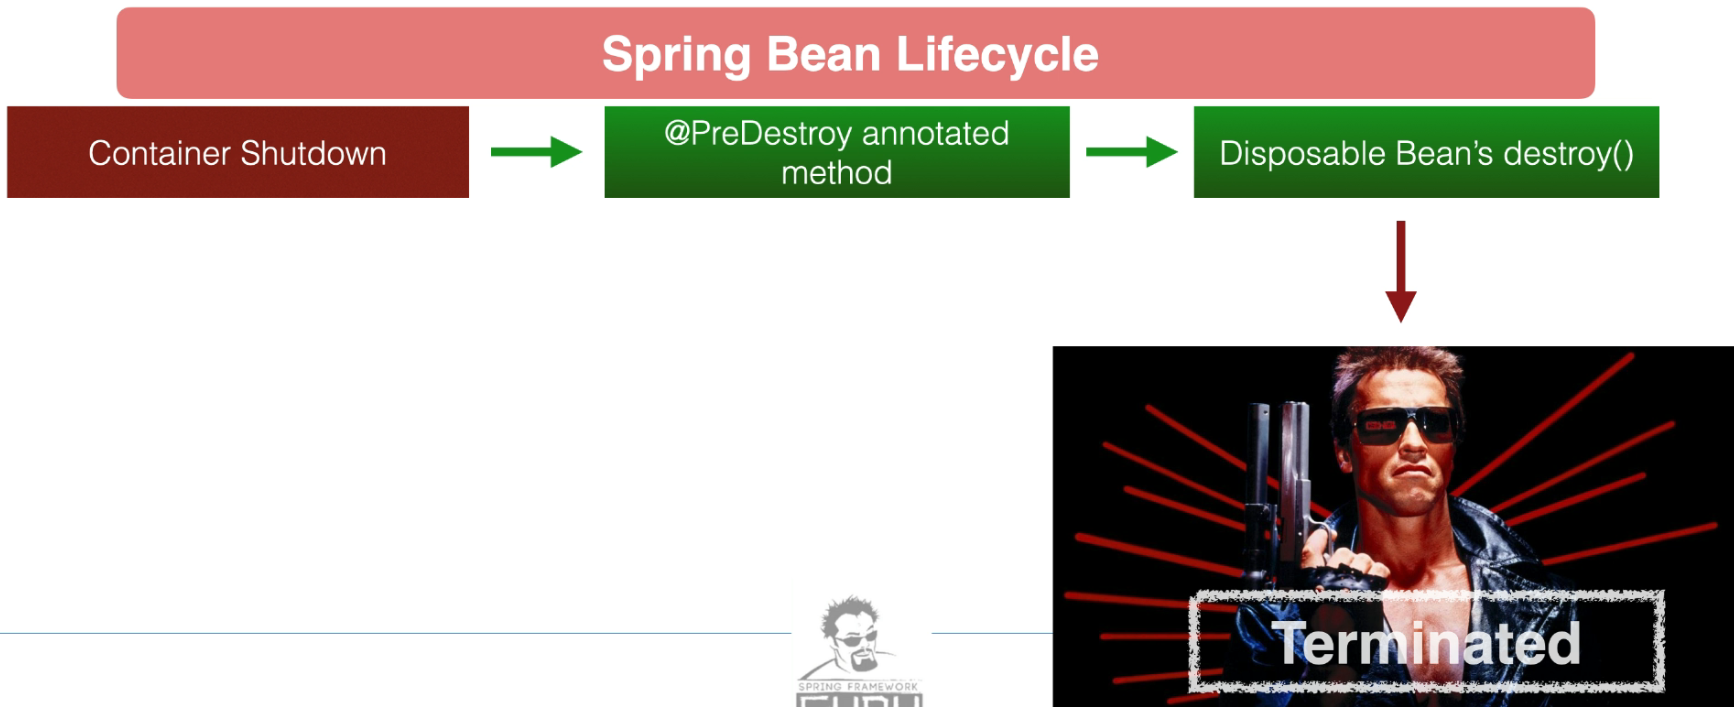 The Spring Bean Lifecycle defines a set of phases that a Spring-managed bean goes through from initialization to destruction. Below is a matrix explaining the key lifecycle phases, their order of execution, methods involved, purpose, and when to use each phase.
Spring Bean Lifecycle Matrix
| Lifecycle Phase | Execution Order | Method(s) | Purpose | When to Use |
|---|---|---|---|---|
| Bean Instantiation | 1 | N/A | Instantiates the bean using the configured constructor. | Automatically managed by Spring. No user intervention needed. |
| Populate Properties | 2 | N/A | Injects dependencies (e.g., via constructor, setter, or field injection). | Happens automatically for dependency injection. Override setter methods if custom logic during property injection. |
Set BeanName | 3 | setBeanName(String name) (from BeanNameAware) | Allows the bean to know its name in the Spring Context. | Use when you need the bean name for specific operations like logging or custom handling. |
Set BeanFactory | 4 | setBeanFactory(BeanFactory beanFactory) (from BeanFactoryAware) | Allows the bean to interact with the BeanFactory directly. | Use when you need to access other beans programmatically from the factory. |
Set ApplicationContext | 5 | setApplicationContext(ApplicationContext context) (from ApplicationContextAware) | Provides access to the ApplicationContext. | Use when your bean requires application context features like accessing resources or event publishing. |
| Post-Initialization | 6 | postProcessBeforeInitialization (from BeanPostProcessor) | Modifies or wraps the bean before initialization methods are called. | Use for adding additional logic or decoration (e.g., AOP proxies, logging, or validation). |
| Custom Init Method | 7 | @PostConstruct or initMethod attribute in XML/JavaConfig | Executes custom logic after the bean is fully initialized. | Use for custom setup tasks such as initializing resources or data. |
| Post-Initialization | 8 | postProcessAfterInitialization (from BeanPostProcessor) | Modifies or wraps the bean after initialization methods are called. | Use for post-setup tasks such as enhancing or wrapping the final bean instance. |
| Bean Ready for Use | 9 | N/A | Bean is now fully initialized and ready for use in the application. | Happens automatically; no user intervention required. |
| Pre-Destroy | 10 | @PreDestroy or destroyMethod attribute in XML/JavaConfig | Executes custom cleanup logic before the bean is destroyed. | Use to release resources, close connections, or clean up custom state. |
| Bean Destruction | 11 | destroy() (from DisposableBean) | Invoked during the destruction of singleton beans. | Use when you want to implement a custom cleanup mechanism directly in the bean class. |
Why and When to Use Each Phase
- Bean Instantiation:
- Automatic by Spring. No need for direct use unless you override the constructor for custom instantiation logic.
- Populate Properties:
- Use setter methods for additional validation or transformation of properties during dependency injection.
- Set Bean Name:
- Use when the bean name is important (e.g., for logging or dynamic bean selection).
- Set BeanFactory:
- Use to interact programmatically with the
BeanFactory, such as fetching other beans dynamically.
- Use to interact programmatically with the
- Set ApplicationContext:
- Use when the bean needs to publish events, access application context resources, or use features like internationalization.
postProcessBeforeInitialization:- Ideal for intercepting or modifying the bean (e.g., adding AOP proxies) before it is fully initialized.
- Custom Init Method:
- Perform setup operations like initializing resources, starting threads, or loading data.
postProcessAfterInitialization:- Enhance or wrap the fully initialized bean with additional functionality.
- Bean Ready for Use:
- Automatically managed. No intervention required.
- Pre-Destroy:
- Perform cleanup operations, such as releasing resources or saving state, before the bean is destroyed.
- Bean Destruction:
- Implement custom cleanup logic in cases where pre-destroy hooks are insufficient.
@Component
public class CustomBean implements BeanNameAware, BeanFactoryAware, ApplicationContextAware, InitializingBean, DisposableBean {

    @Override
    public void setBeanName(String name) {
        System.out.println("Bean Name is: " + name);
    }

    @Override
    public void setBeanFactory(BeanFactory beanFactory) {
        System.out.println("BeanFactory is set");
    }

    @Override
    public void setApplicationContext(ApplicationContext applicationContext) {
        System.out.println("ApplicationContext is set");
    }

    @PostConstruct
    public void customInit() {
        System.out.println("Custom initialization logic");
    }

    @Override
    public void afterPropertiesSet() {
        System.out.println("Properties are set, ready for use");
    }

    @PreDestroy
    public void preDestroy() {
        System.out.println("Pre-destroy cleanup logic");
    }

    @Override
    public void destroy() {
        System.out.println("Bean is destroyed");
    }
}
RESTful api
Richardson Maturity Model (RMM)
The Richardson Maturity Model (RMM) is a classification system for RESTful APIs, introduced by Leonard Richardson. It defines levels of maturity based on how well APIs follow RESTful principles. Each level represents an improvement in adherence to REST constraints, promoting better scalability, usability, and maintainability.
Here’s a detailed table of the RMM levels:
| RMM Level | Name | Characteristics | Explanation | Example |
|---|---|---|---|---|
| 0 | Level 0: The Swamp of POX | - Relies on a single URI for all actions. - Uses HTTP only as a transport mechanism. - Not RESTful. | All interactions happen through a single endpoint, typically ignoring HTTP methods or status codes. | A single endpoint like /api where all requests are POST, and operations are defined via query parameters or JSON. |
| 1 | Level 1: Resources | - Introduces resources as separate URIs. - Identifies individual entities (e.g., /books, /users). | Resources are identifiable, but HTTP methods (GET, POST, PUT, DELETE) are not consistently or correctly used. | /books/1 and /users/5 endpoints exist, but every operation uses POST, such as /books/1?action=delete. |
| 2 | Level 2: HTTP Verbs | - Uses HTTP methods correctly (GET, POST, PUT, DELETE). - Leverages HTTP status codes effectively. | Follows REST semantics by aligning operations (CRUD) with HTTP methods and conveying responses with status codes. | GET /books returns a list of books; POST /books creates a new book; DELETE /books/1 deletes a book. |
| 3 | Level 3: Hypermedia (HATEOAS) | - Incorporates Hypermedia As The Engine Of Application State (HATEOAS). - Links for navigation are provided. | Clients dynamically discover actions or relationships through links embedded in responses. | A GET /books/1 response includes a link to /books/1/authors to retrieve related authors. |
Explanation of Levels
-
Level 0 (Swamp of POX):
- The API uses HTTP as a mere transport layer for RPC-like operations, with little to no adherence to RESTful principles.
- Example: SOAP APIs or APIs using POST requests for all actions.
-
Level 1 (Resources):
- Resources are exposed through separate URIs. However, HTTP is still not fully utilized.
- Example: API endpoints represent entities but don’t use HTTP verbs correctly (e.g., always using POST).
-
Level 2 (HTTP Verbs):
- Resources are exposed with proper HTTP methods and status codes, providing a more RESTful interface.
- This level is suitable for most REST APIs.
- Example: CRUD operations are aligned with HTTP verbs (GET, POST, PUT, DELETE).
-
Level 3 (HATEOAS):
- The most advanced level where APIs are fully RESTful.
- Clients can discover available actions and navigate the API dynamically using hypermedia links.
- Example: A response provides embedded links for related resources, guiding the client for further interactions.
When to Target Each Level
- Level 1: When you want a basic REST structure to separate resources but don’t require strict adherence to REST principles.
- Level 2: When you aim for a fully functional and RESTful API with proper CRUD operations and HTTP status codes.
- Level 3: When building APIs intended for dynamic, self-discoverable interactions (e.g., complex systems requiring client flexibility).
In Spring Framework, the difference between @RestController and @Controller lies in their intended use and how they handle HTTP requests and responses. Here’s a detailed explanation:
@Controller vs @RestController
1. @Controller
-
Purpose:
- Used in traditional Spring MVC applications where the response is typically a view (e.g., a JSP or HTML page).
- It is part of the Spring MVC framework and is used to define a controller class that handles web requests.
-
Behavior:
- Methods in a class annotated with
@Controllerreturn a view name by default. - The view name is resolved by a
ViewResolverto render the appropriate view (e.g., a JSP or Thymeleaf template).
- Methods in a class annotated with
-
Example:
@Controller public class MyController { @GetMapping("/hello") public String hello(Model model) { model.addAttribute("message", "Hello, World!"); return "hello"; // Resolved to a view named "hello.jsp" or "hello.html". } } -
Use Case:
- When you want to create a traditional server-side rendered web application.
2. @RestController
-
Purpose:
- Introduced in Spring 4.0 to simplify the creation of RESTful web services.
- Combines the behavior of
@Controllerand@ResponseBody.
-
Behavior:
- All methods in a class annotated with
@RestControllerreturn data directly (e.g., JSON, XML) instead of a view. - The response is automatically serialized into the format specified by the client (typically JSON) using
HttpMessageConverters.
- All methods in a class annotated with
-
Example:
@RestController public class MyRestController { @GetMapping("/greet") public String greet() { return "Hello, World!"; // Directly returns "Hello, World!" as the response body. } } -
Equivalent to:
@Controller @ResponseBody public class MyController { @GetMapping("/greet") public String greet() { return "Hello, World!"; } } -
Use Case:
- When building RESTful APIs or web services where the server responds with data (e.g., JSON or XML) rather than rendering views.
Key Differences:
| Feature | @Controller | @RestController |
|---|---|---|
| Default Response | Returns a view name | Returns data (e.g., JSON, XML) |
| Annotations Combined | @Controller | @Controller + @ResponseBody |
| Primary Use Case | Traditional web applications | RESTful web services |
| View Resolver Interaction | Resolves view names to render templates | No interaction with view resolvers |
When to Use Which?
- Use
@Controllerwhen you are building traditional web applications that return views. - Use
@RestControllerwhen creating REST APIs or applications where the server responds with serialized data directly.