Simplified Explanation: MockMVC Testing in Spring
Overview of Testing Types
- Unit Tests:
- Test individual pieces of code (e.g., a single class or method).
- Should be fast, lightweight, and independent of external systems (no databases, Spring context, or servers).
- Focus on code coverage, ideally 70-80%.
- Examples include validating logic or behavior within a class.
- Integration Tests:
- Test interactions between components (e.g., multiple classes or modules).
- Can involve the Spring context, databases, or message brokers.
- Broader in scope and slower compared to unit tests.
- Functional Tests:
- Test the system end-to-end, often on a running application.
- Simulate user interactions, such as API calls, and validate outcomes.
- These are the heaviest and most time-consuming tests.
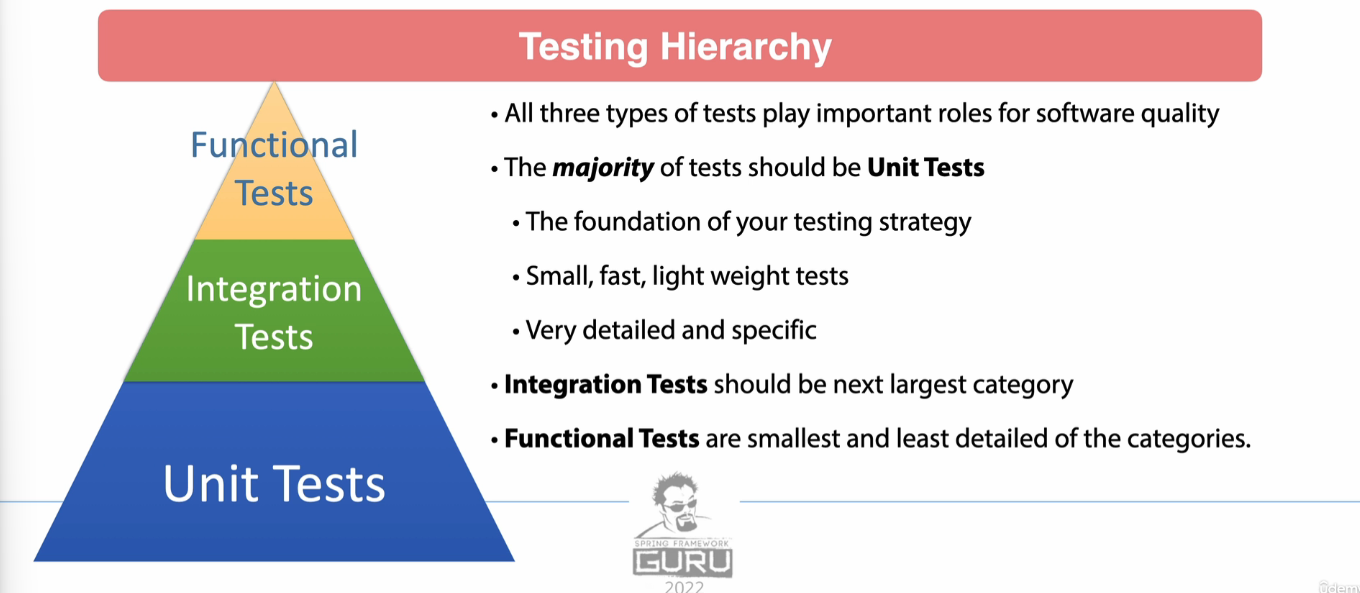
Testing Pyramid
- Base: Unit Tests (most tests should fall here).
- Middle: Integration Tests.
- Top: Functional Tests (least detailed, lowest volume).
Why Controllers Are Hard to Unit Test
Spring MVC controllers rely heavily on the framework for:
- Routing requests.
- Binding data (e.g., JSON to Java objects).
- Formatting responses.
Because of this, pure unit tests often fall short. Enter MockMVC, a tool that simulates the servlet environment and provides:
- Mock HTTP requests and responses.
- A dispatch servlet (mimicking a real web server).
What Makes MockMVC Special?
MockMVCruns in a controlled Spring test environment.- It can work with or without a full Spring context:
- Without Spring context: Closer to true unit tests.
- With Spring context: Considered integration tests.
Important
By using WebMvcTest, you load only a small slice of the Spring context, focusing on the controller under test. Dependencies (like services) are not automatically loaded, so you use mocks for them.
Using Mockito for Mocks
Mockito is a popular framework for creating test doubles:
- Dummy: Exists only to make code compile.
- Fake: Simple implementation, not production-ready.
- Stub: Returns predefined responses to specific calls.
- Mock: Like a stub, but can verify interactions (e.g., call count).
- Spy: Wraps an actual object, allowing you to monitor interactions.
Mocks are especially useful in controller tests for:
- Verifying input data is parsed correctly (e.g., JSON to objects).
- Simulating service layer responses.
- Testing exception handling.
Testing Flow with MockMVC

- Set up the test environment:
- Use JUnit to provide the test framework.
- Configure Spring MockMVC via
WebMvcTest. - Mock dependencies with Mockito.
- Write the test:
- Simulate a request (e.g.,
GET /users/1). - Mock the service layer’s response.
- Verify the controller’s logic and response formatting.
- Simulate a request (e.g.,
- Validate outputs:
- Ensure JSON data is parsed and bound correctly.
- Confirm service methods were called as expected.
- Test response data, including exceptions.
@SpringBootTest vs @WebMvcTest
Here’s a breakdown of the differences between @SpringBootTest and @WebMvcTest(BeerController.class) with examples:
1. Purpose
-
@SpringBootTest:- Loads the entire Spring application context.
- Useful for integration tests that require all the application components, including services, repositories, and the full Spring Boot environment.
- Runs slower due to the overhead of initializing the full context.
-
@WebMvcTest(BeerController.class):- Loads only the Spring MVC components relevant to the specified controller (
BeerControllerin this case). - Useful for focused testing of the web layer (e.g., controllers, request mapping, response handling).
- Runs faster because it doesn’t load the entire application context.
- Loads only the Spring MVC components relevant to the specified controller (
2. Dependencies and Setup
@SpringBootTest:-
Includes all application components like services, repositories, and configurations.
-
All dependencies are injected by the Spring container.
@SpringBootTest class BeerControllerTest { @Autowired BeerController beerController; @Test void getBeerById() { System.out.println(beerController.getBeerById(UUID.randomUUID())); } } -
In this example,
BeerControllerdepends onBeerService. Since the full context is loaded, the realBeerServiceimplementation would be used unless explicitly mocked.
-
@WebMvcTest(BeerController.class):-
Focuses only on the MVC layer.
-
Requires explicitly mocking dependencies like
BeerService(using@MockBeanorMockitoBean). -
Doesn’t include non-web-related beans like repositories or external configurations.
@WebMvcTest(BeerController.class) class BeerControllerTest { @Autowired MockMvc mockMvc; @MockitoBean BeerService beerService; @Test void getBeerById() throws Exception { Beer testBeer = new Beer(UUID.randomUUID(), "Test Beer", "IPA", 6.5); given(beerService.getBeerById(any(UUID.class))).willReturn(testBeer); mockMvc.perform(get("/api/v1/beer/" + UUID.randomUUID()) .accept(MediaType.APPLICATION_JSON)) .andExpect(status().isOk()) .andExpect(content().contentType(MediaType.APPLICATION_JSON)); } } -
In this example,
BeerServiceis mocked, ensuring that only theBeerControllerlogic is tested, without interacting with the actualBeerServiceimplementation.
-
3. When to Use
-
@SpringBootTest:- Use for end-to-end integration testing when you need the complete application context.
- For example:
- Testing service-layer logic along with database integration.
- Verifying how multiple components work together.
-
@WebMvcTest:- Use for controller testing when you want to focus on request mappings, input validation, response formats, and HTTP behavior.
- It’s faster and more focused than
@SpringBootTest.
4. Performance
@SpringBootTest: Slower due to the full context initialization.@WebMvcTest: Faster because only the web layer is initialized.
Key Takeaway:
- Use
@SpringBootTestfor comprehensive integration tests that involve multiple layers of the application. - Use
@WebMvcTestfor isolated controller tests, mocking dependencies and focusing on the web layer.
Testing JSON response with Jayway JsonPath
@WebMvcTest(BeerController.class)
class BeerControllerTest {

    @Autowired
    MockMvc mockMvc;

    @MockitoBean
    BeerService beerService;

    BeerServiceImpl beerServiceImpl = new BeerServiceImpl();

    @Test
    void getBeerById() throws Exception {
        Beer testBeer = beerServiceImpl.listBeers().get(0);

        given(beerService.getBeerById(testBeer.getId())).willReturn(testBeer);

        mockMvc.perform(get("/api/v1/beer/" + testBeer.getId())
                .accept(MediaType.APPLICATION_JSON))
                .andExpect(status().isOk())
                .andExpect(content().contentType(MediaType.APPLICATION_JSON))
                .andExpect(jsonPath("$.id", is(testBeer.getId().toString())))
                .andExpect(jsonPath("$.beerName", is(testBeer.getBeerName())));
    }
}
Testing creating JSON with Jackson to do the POST
We want to create and update beer objects using our API, which means we need to pass JSON data into MockMvc. While you could handwrite the JSON, that’s tedious and error-prone. A better approach is to use Jackson, a library that can handle JSON serialization and deserialization for us.
Getting Started with Jackson
Jackson provides an ObjectMapper, a powerful tool for converting Java objects (POJOs) to JSON and vice versa. Let’s start by creating a simple test using it. We’ll use a beer object from our BeerServiceImpl and convert it to JSON.
-
Basic Conversion:
objectMapper.writeValueAsString(beer);This converts the beer object to a JSON string. However, if something goes wrong, this method throws an exception, so we’ll add it to the test signature.
-
Handling Date Formats: By default, Jackson doesn’t support Java 8
LocalDateTime. Running the test will result in an error. To fix this, we need to configure Jackson to load the appropriate module:objectMapper.findAndRegisterModules();This enables support for handling Java 8 date/time types. Now the test should pass, and you’ll see the JSON representation of the beer object.
-
Improving Configuration: The default date format may not be ideal. Jackson offers many configuration options, but instead of customizing everything manually, we can use Spring Boot’s pre-configured
ObjectMapper.
Using Spring Boot’s ObjectMapper
Spring Boot automatically configures an ObjectMapper with sensible defaults. Instead of creating a new instance, we can use the one provided by the Spring context.
-
Autowiring the
ObjectMapper:@Autowired private ObjectMapper objectMapper;This ensures that the same configuration is used across both tests and application components, avoiding conflicts and duplicate configurations.
-
Benefits:
- You get consistent behavior for date formats and other settings.
- Spring Boot’s defaults are often sufficient, but they can be customized if needed.
- Reduces maintenance since there’s only one configuration to manage.
When we run the test with Spring Boot’s ObjectMapper, we’ll see improvements like a nicely formatted date.
@WebMvcTest(BeerController.class)
class BeerControllerTest {

    @Autowired
    MockMvc mockMvc;

    @Autowired
    ObjectMapper objectMapper;

    @MockitoBean
    BeerService beerService;

    BeerServiceImpl beerServiceImpl;

    @BeforeEach
    void setUp() {
        beerServiceImpl = new BeerServiceImpl();
    }

    @Test
    void testCreateNewBeer() throws Exception {
        Beer beer = beerServiceImpl.listBeers().get(0);
        beer.setVersion(null);
        beer.setId(null);

        given(beerService.saveNewBeer(any(Beer.class))).willReturn(beerServiceImpl.listBeers().get(1));

        mockMvc.perform(post("/api/v1/beer")
                .accept(MediaType.APPLICATION_JSON)
                        .contentType(MediaType.APPLICATION_JSON)
                        .content(objectMapper.writeValueAsString(beer)))
                .andExpect(status().isCreated())
                .andExpect(header().exists("Location"));
    }
}
Key Takeaways
- Jackson’s
ObjectMappersimplifies woNrking with JSON. - Spring Boot provides a pre-configured
ObjectMapperthat aligns with the application’s settings. - Always use the Spring-provided
ObjectMapperin tests to ensure consistency and avoid conflicts. - In the next step, we’ll use the generated JSON to create a new beer using our controller.
This approach ensures we follow best practices while keeping our code clean and maintainable.
Error handling
How to throw exception by mockito
@Test
void getBeerByIdNotFound() throws Exception {
given(beerService.getBeerById(any(UUID.class))).willThrow(NotFoundException.class);
    mockMvc.perform(get(BeerController.BEER_PATH_ID, UUID.randomUUID()))
            .andExpect(status().isNotFound());
}
@ControllerAdvice
Controller advice in Spring is a mechanism for handling cross-cutting concerns in web applications, such as exception handling, binding validation, or model attributes setup. It uses the @ControllerAdvice annotation to centralize and decouple these concerns from individual controllers.
- Customize the response
- Control over the Response Body
Key Features of @ControllerAdvice
-
Centralized Exception Handling:
- It allows you to handle exceptions for multiple controllers in one place.
- Paired with
@ExceptionHandler, it makes it easy to define responses for specific exceptions. Example:
@ControllerAdvice public class GlobalExceptionHandler { @ExceptionHandler(ResourceNotFoundException.class) public ResponseEntity<String> handleNotFound(ResourceNotFoundException ex) { return ResponseEntity.status(HttpStatus.NOT_FOUND).body(ex.getMessage()); } } -
Global Model Attributes:
- You can define attributes that should be available to all controllers.
- Use the
@ModelAttributeannotation for this purpose.
Example:
@ControllerAdvice
public class GlobalModelAttributes {

    @ModelAttribute("appName")
    public String appName() {
        return "My Application";
    }
}
Any controller can now access
appNamein its views. -
Request and Response Body Customization:
- You can modify request or response bodies globally using
@InitBinder.
Example:
@ControllerAdvice public class GlobalBindingInitializer { @InitBinder public void customizeBinding(WebDataBinder binder) { binder.registerCustomEditor(LocalDate.class, new CustomDateEditor()); } } - You can modify request or response bodies globally using
When to Use @ControllerAdvice
- Exception Handling: To centralize error handling for cleaner controllers and consistent error responses.
- Common Data Sharing: To share attributes like application metadata or user details across all views.
- Input Binding Customization: To apply uniform data binding rules (e.g., formatting dates) across controllers.
Advantages of @ControllerAdvice
- Reusability: One place to handle concerns for multiple controllers.
- Readability: Keeps controllers focused on request handling logic.
- Consistency: Provides a uniform way to handle exceptions and set up model attributes.
- Scalability: Easy to update or extend as the application grows.
In summary, @ControllerAdvice is a powerful tool to manage cross-cutting concerns efficiently, promoting cleaner, more modular, and maintainable code in Spring applications.
Response status annotation
@ResponseStatus(value = HttpStatus.NOT_FOUND, reason = "Value Not Found")
public class NotFoundException extends RuntimeException {
    public NotFoundException() {
    }

    public NotFoundException(String message) {
        super(message);
    }

    public NotFoundException(String message, Throwable cause) {
        super(message, cause);
    }

    public NotFoundException(Throwable cause) {
        super(cause);
    }

    public NotFoundException(String message, Throwable cause, boolean enableSuppression, boolean writableStackTrace) {
        super(message, cause, enableSuppression, writableStackTrace);
    }
}